Do-it-yourself ceiling lighting around the perimeter
[ads-quote-center cite='Stephen King']“The only thing that matters is how much light you radiate on the path of life”[/ads-quote-center]
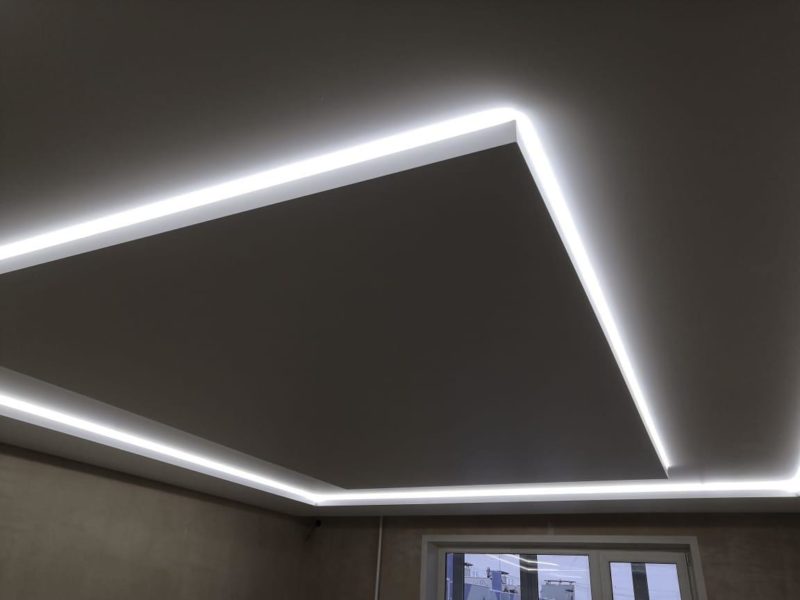
A perimeter illuminated ceiling is not only an attractive interior design for the most sophisticated fashion connoisseurs, but also a practical implementation of a small investment for a big benefit. Along with beauty, such a ceiling will create additional lighting to the installed light sources.
Depending on the power of the fixtures installed as a backlight, you can achieve a glow that does not require main light sources. The regulator will allow you to change the brightness for the working and evening atmosphere. We will talk about this and all the intricacies of lighting equipment and options for installing lighting on your ceiling around the perimeter.
Not all light sources are suitable
[ads-quote-center cite='Mohammed']“He who leaves his parents in old age will not enter Paradise”[/ads-quote-center]
We will consider three options, but not all will be able to install, because some require installation during the repair. I would like to point out right away that LED strip lighting will be the most convenient and energy efficient solution.
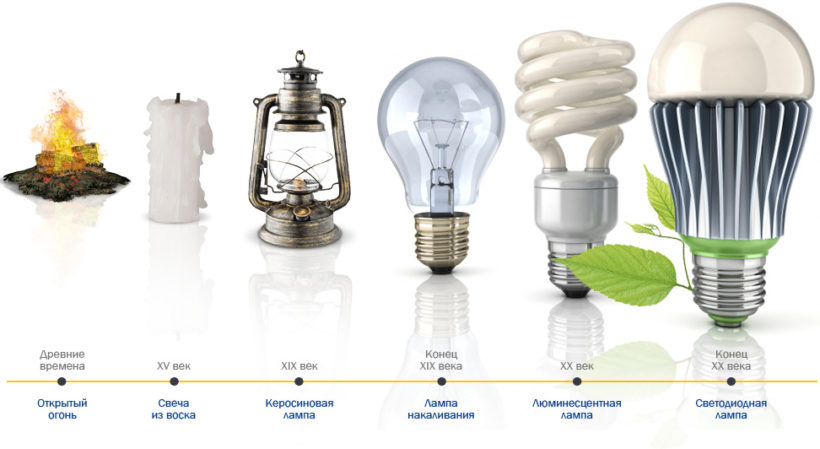
Fluorescent and gas-discharge economical lamps
In some cases, when the repair has not yet been made, but is only at the project stage, it is possible to lay a wire in plasterboard niches in any convenient place and use ordinary fluorescent or gas-discharge economical lamps. Such a backlight will do its job well, but a perimeter-lit ceiling with lamps will have a number of disadvantages:
- outdated version;
- high power consumption;
- lack of remote control and a variety of shades.

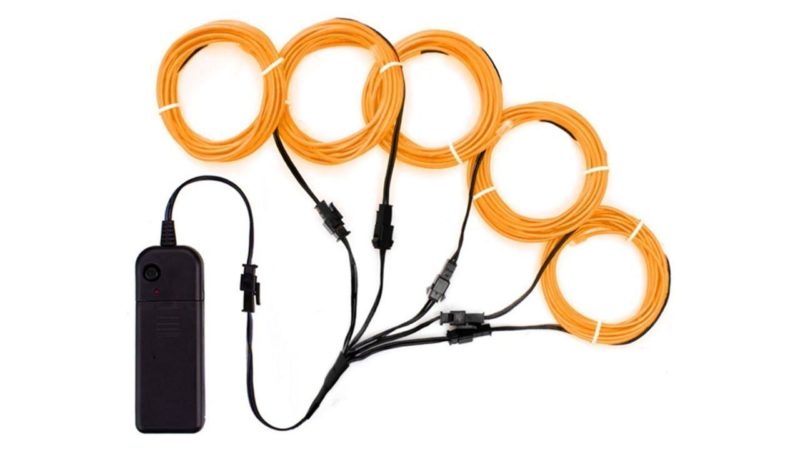
Cold neon or El cord
[ads-quote-center cite='Maria Farisa']“The house will appear when you are ready for it. Don't think about money. Don't think about age - wind with a ribbon. Whoever seeks the path finds it”[/ads-quote-center]
Such room lighting would be a very interesting option, but, as a rule, it is better to use such a device to emphasize some special contours, since such a cord will not give a lot of light. In our case, we need to achieve the maximum level of illumination, not only for beauty, but also for good, so let's move on.
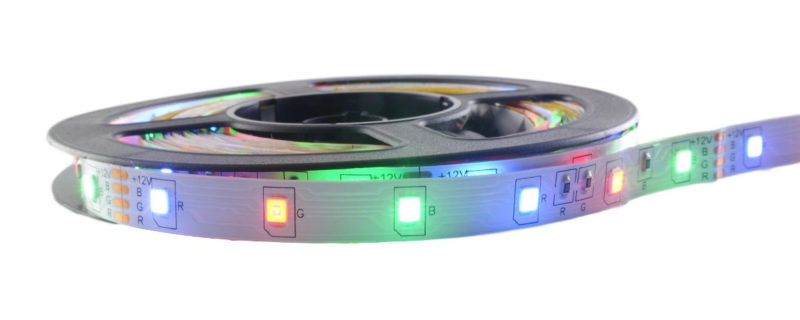
LED Strip Light
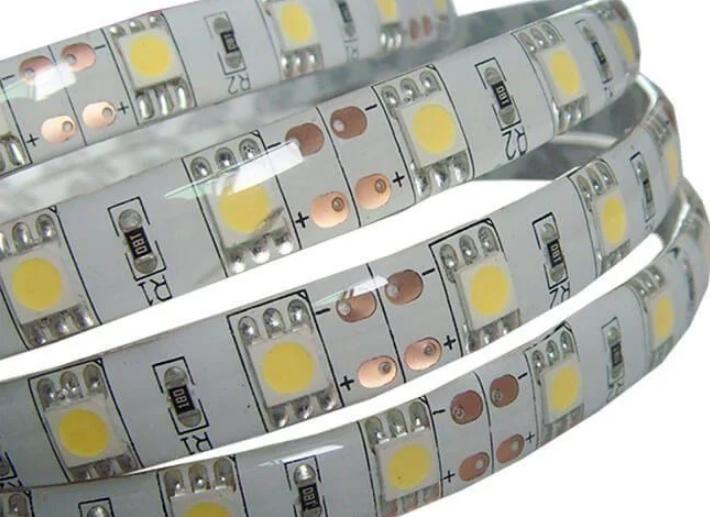
Option with led strip powered by constant voltage from a 12 V power supply. It has high luminous flux and many colors. Multiple colors can be set on one ribbon. Thanks to the control module, you can choose the one that you like today.
Ease of installation and low cost, along with versatility of use, will be the perfect formula to opt for it. Next, we will return to this light source and tell in more detail the secrets and subtleties of installing such a lighting fixture.
Features of LED strip lighting
Performing lighting around the perimeter of the ceiling, use a little trick. Such lighting can be installed not only in pre-made niches in the ceiling. You can use a universal skirting board for the ceiling, but this is not the only option. Such a plinth has a special niche where the LED strip will fit perfectly.
The tape is mounted in the baseboard due to its sticky base, and the wires can also be successfully placed there. We will consider the features of installation and the subtleties of connecting sections further. Plinth can be plastic, foam and aluminum
If you do not want to install in this way, just stick it in any place convenient for you, for example, the top of the furniture in the kitchen or any tall furniture in the room. To hide the power wire, use the cable channel, it will reliably protect and hide the unwanted picture.
How to make lighting with lamps
[ads-quote-center cite='Novel "Legend of the Willow"']“Before you judge someone's life, remember that you draw a conclusion based only on what you were given to see”[/ads-quote-center]
The ceiling can be illuminated not only with ribbons and tubes. You can emphasize the peculiarity of your ceiling in a simple way. Installation track lights allows you to create spot lighting areas as you wish. Some models are adapted specifically for ceiling lighting. The light sources are gas-discharge and LED lamp.

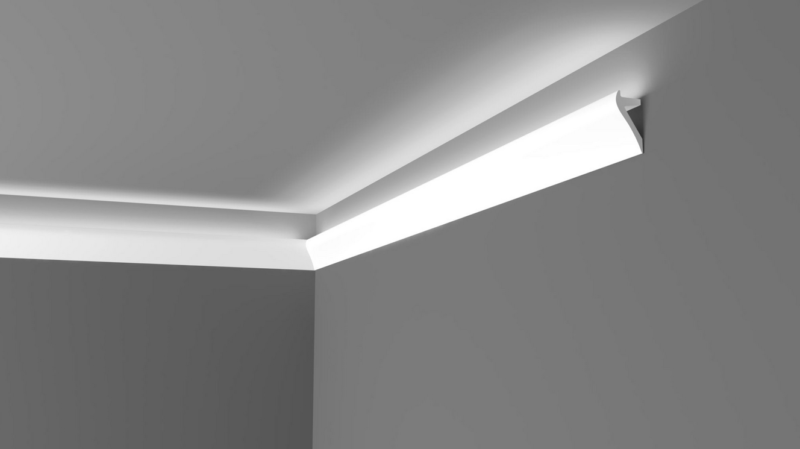
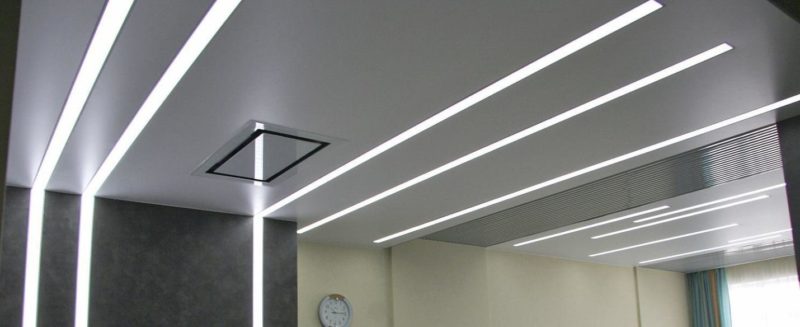
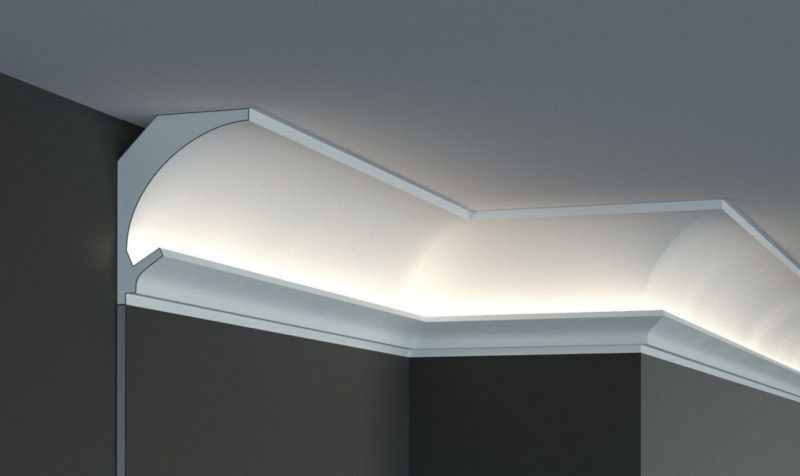
The original solution for lighting around the perimeter of the ceiling and not only will be the use of linear fixtures. Thanks to the overhead design, they can be placed on the wall and directed to the ceiling. But perhaps the most ingenious solution, if you just planned a repair, would be to use a mortise profile with a diffuser.
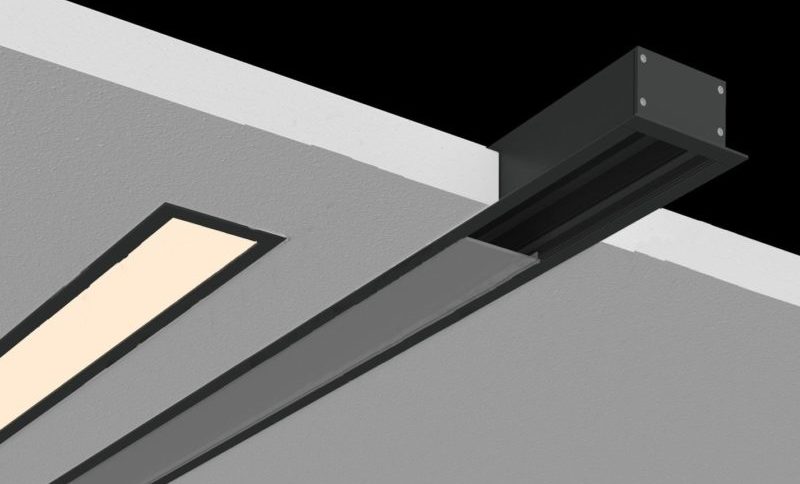
Thanks to its design, it can be installed in any position and thus create geometric shapes that almost no one has seen before. As elements of light, it is best to install an LED strip in it, it will allow you to give uniform brightness along the entire length.

LED strip installation
The LED strip along the perimeter of the stretch ceiling will look best in the plinth due to the fact that the diffused light will be reflected from its surface. This solution can be applied in almost any large room and even in the bathroom. By the way, when installing in the bathroom, do not forget about the safety rules and use a tape with an IP68 degree of protection - this will protect you and your equipment from short circuits.
The ceiling with lighting around the perimeter using a plinth is done in the following order:
- Necessary calculatehow many meters of LED strip you need. When buying a tape, choose a powerful power supply. One piece of bright white tape can load up to 100 watts.
- Measure the length of the skirting board and decide which one you will use. Foam skirting can be easily glued, plastic and aluminum, most likely, will require drilling into the wall for a dowel.
- Measure the wire with which you will power the power supply and the tape, decide on the installation location of the power supply.
- If you decide to install multicolor backlight, consider purchasing a controller, it will allow you to switch the backlight modes using the remote control.
- If you don't have a soldering iron, purchase connectors to connect sections of tape.
- If you have a soldering iron, watch the thematic video below.
- Go shopping.
When you go shopping, consider that to light a room that is 3m wide by 4m long and has a ceiling height of 3m, you will need an average of 8,000 lumens of lumen output to illuminate a room at medium brightness. Divide this value as you like and depending on how much light you want to add.
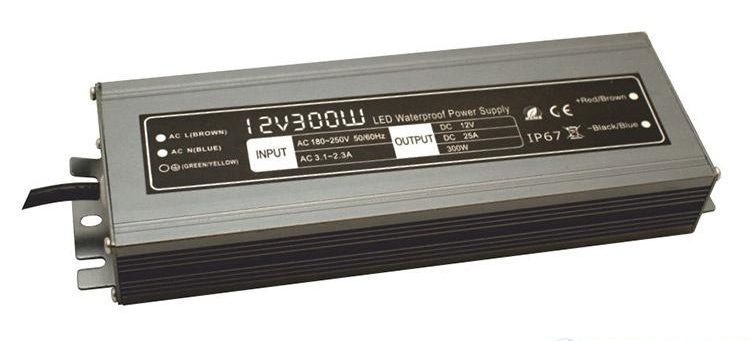
The luminous flux is measured in lumens and is indicated on the packaging. Choose a power supply based on the power consumption of the tape, it is also indicated on the packaging. The power reserve of the power supply must be at least 20%.
The LED strip is connected to the power supply with a cable with a cross section of 2 cores of 0.75 mm2 each. It is not recommended to use a wire with a smaller diameter. Currents can reach 10 A.
You should pay your attention that the LED strip will not tolerate bending at an acute angle. It is based on a printed circuit board, so all angles are recommended cut in the indicated places and solder either unite using connectors.
Video: How to solder the tape.
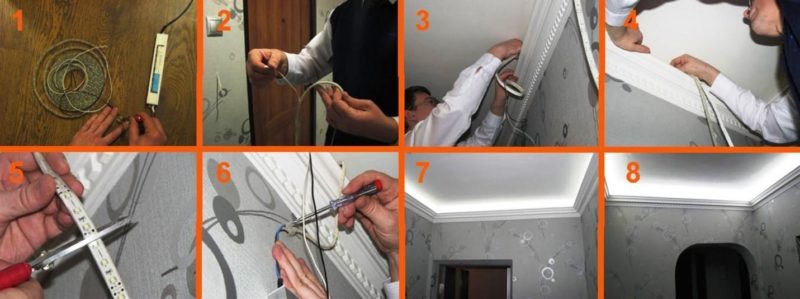
First of all, install the baseboard, and then proceed with the installation of the tape. Please note that when using a soldering iron, do not use acid solder. Over time, they corrode the soldering points and the contact is broken, in the future such an installation will serve as a reason for the tape to flicker.
The tape is mounted as a whole section in length no more than 5 meters.If we need to power the perimeter, which is more than 5 meters, then the next 5 meters connect to the network not in series to the previous tape, but again from the power supply.
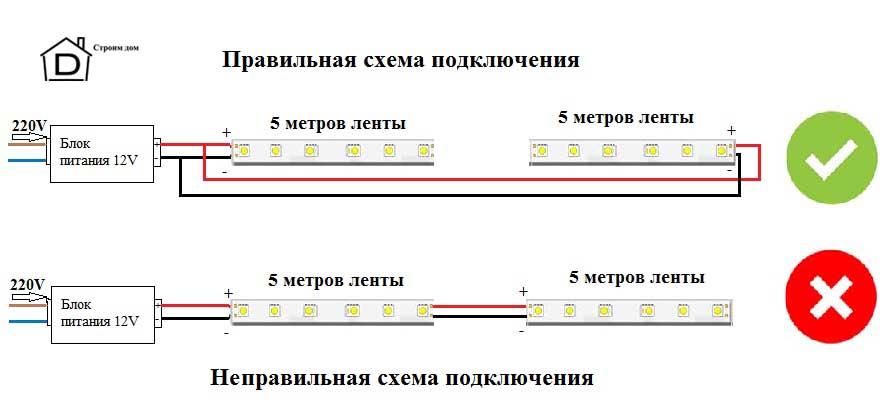
Pull the cable straight from the place where the block is installed or from the place where you can cut into the core before connecting the tape, but in no case connect to the end of the tape that comes before the previous one.
After the plinth is installed, proceed with the installation of the tape. To do this, first solder all the joints, then remove the protective layer of the sticky side and carefully glue it into the baseboard. All connections must be passed soldering iron or use connectors.
Additional equipment for connection
When the lighting around the perimeter of the ceiling has already been completed, you can supplement it with a useful device. The LED strip controller will allow you to control the glow modes of the tape using the remote control.
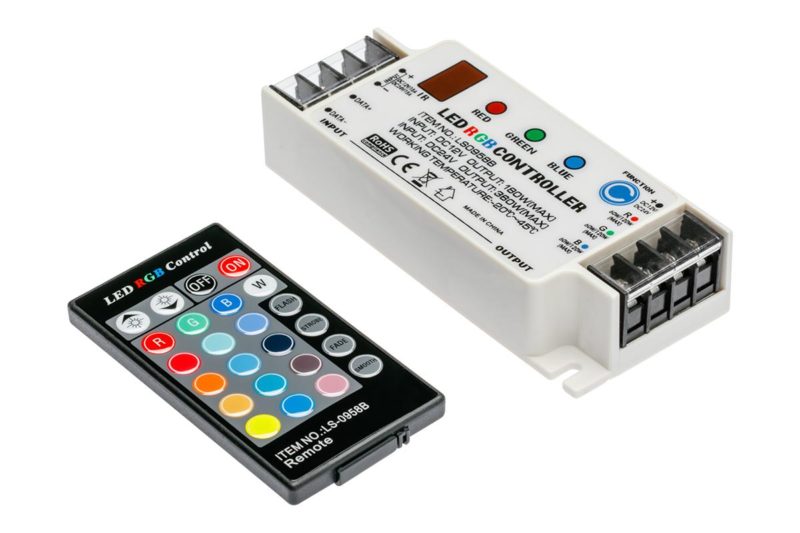
Such a device is simply included in the circuit after the power supply and does not require special installation skills. With the help of such equipment, you can control four colors of the ribbon at the same time and use the color that is closer to your liking at a given time.
Helpful Hints
You don't have to worry about tape mounting method. All the methods of fastening we have provided help to carefully hide the traces of installation and make the upgrade fit into the interior.The LED strip can be glued to the cabinet or to the base of the ceiling, it's up to you how to do it. The main thing is that it is useful.
