Light stripes on a stretch ceiling - types and features
The light lines on the stretch ceiling look original and transform the surface. There are different options for implementing this solution, so it's worth understanding them to choose the right one. It can be used both for decoration and as the main lighting if the line width is large and enough light sources are installed inside.

Key Features
It should be noted right away that making stripes on the ceiling is much more difficult than hanging a chandelier or placing spotlights. Therefore, most often the work is entrusted to professionals. As for the features, they are:
- Only used as a light source LED lamp and ribbons. This is due to the fact that this option does not heat up much during operation and gives a bright, even light without flickering.Another big plus is a long service life, you don’t have to climb into the structure and change light sources a couple of years after installation.
- The easiest way to make compositions consisting of straight lines. There can be many options - from a single straight element to broken lines and patterns with intersecting lines. You can make the highlight with oval outlines, but it is much more difficult to implement, so it is rare.
- Lines serve as an original decor, attract attention and are one of the main accents of the decor. But if you make them wide, and place light sources of high brightness inside, then you can use this option as the main light, the main thing is to comply with the lighting standards for a particular room.
![Light stripes as an addition to the main light.]() Light stripes as an addition to the main light.
Light stripes as an addition to the main light. - The most commonly used white light, which can be different – from warm to natural or cold spectrum. At the same time, the color of the backlight depends not only on the lamps, but also on the characteristics of the light filter or stretch fabric, if the light flux goes through it.
- To change the shades of the backlight, it is better to set RGB tape. If high-quality lighting is important, then a single-color version of high power with a frequent arrangement of LEDs is more suitable.

It is worth using only special equipment and profiles to create lines. Do-it-yourself solutions are best not to apply.
Types of built-in linear fixtures for stretch ceilings
Only light sources of a certain type can be used. This is due both to safety requirements and to the fact that the luminous lines must be uniform, without dark areas and highlights. Therefore, only two types are used:
- LED strips. The best solution that can be glued to both straight and oval lines. There are a lot of varieties, the characteristics depend on the number of LEDs per linear meter. If you need high brightness, you should choose options with bright diodes arranged in two rows. Usually monochromatic with natural or cold white light is used, but if desired, you can also use colored ones, the most popular are the illumination of blue and yellow colors. Due to the diffuser, a uniform luminous flux is obtained.
- T5-T8 tubular LED lamps are also well suited for creating light strips. They can only be used to create straight lines, lamps give a bright uniform light and are often used for basic lighting. The length of one element can be from 50 to 120 cm, this moment must be taken into account when planning the lines, otherwise it will not work to place the lamps normally and there will be dark areas in the stripes.
Installing halogen and other options is not worth it, as they will not provide the desired quality of light and will get very hot during operation, which will eventually lead to yellowing of the stretch ceiling.
Profiles for creating light lines in a stretch ceiling
In order for the LED lines on the ceiling to be perfectly even and give the desired effect, special profiles are used. There are many options and each has its own characteristics, it is worth considering the most common solutions:
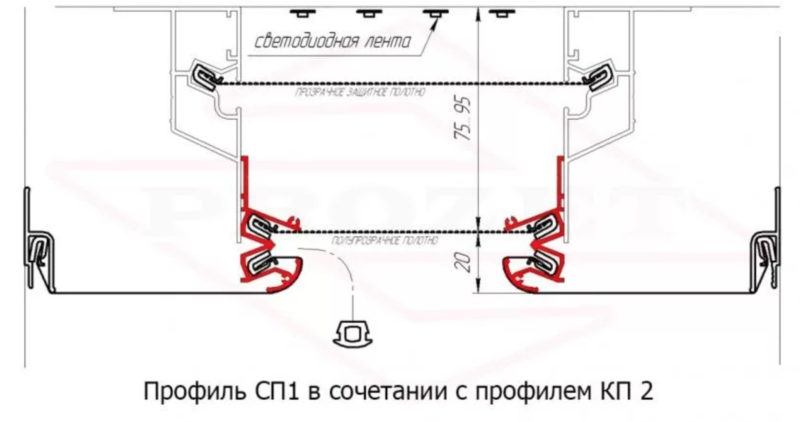
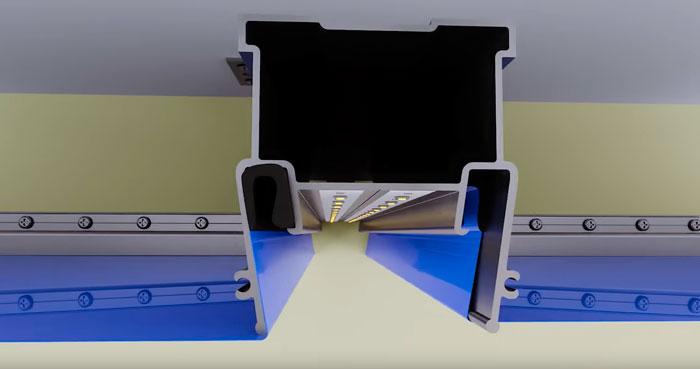
- SP1 - a universal type, which is used both for creating a light line and for joining different canvases on the same level or in the construction of multi-level systems. Usually this element is attached to the KP2 profile, which is located on the ceiling.The space between the two profiles is covered with a translucent film to scatter light, and the joint is decorated with an oval insert. In this case, the light line is always recessed into the surface; not everyone likes a small recess.
![Light stripes on a stretch ceiling - types and features]() A combination of two types of profile.
A combination of two types of profile.![kp 2 profile]() Frame profile KP 2
Frame profile KP 2 - SP2 are used much more often, since when mounting light strips with its help, the surface is smooth. In this case, the profile is attached in the same way as the previous version. The minimum line width is 20 mm, and the maximum is not limited, you can make such an indent that will look best in the room.
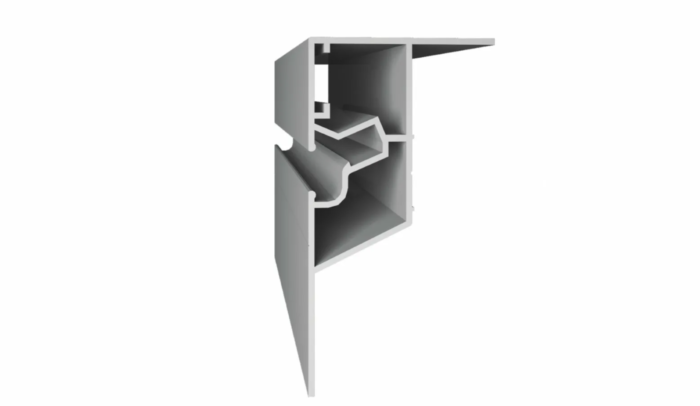
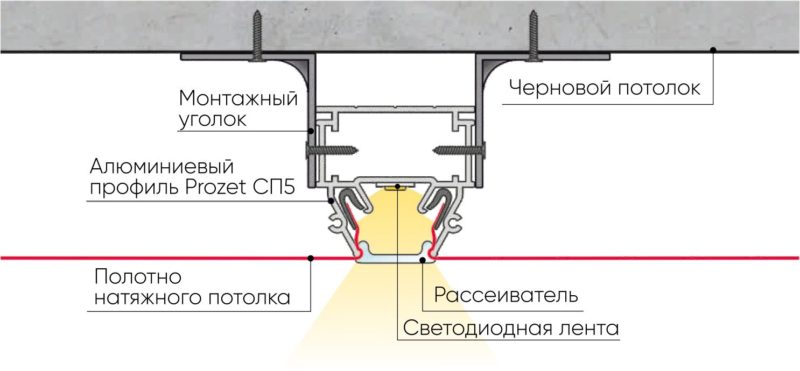
- SP5 - a specially designed version for creating light lines with a width of 18 mm. It is attached directly to the surface of the ceiling, which simplifies the work, and the outer part is covered with a special diffuser that provides uniform illumination.
![Light stripes on a stretch ceiling - types and features]() profile design SP5
profile design SP5 - KP4075 has a design similar to the previous solution, but you can put an LED strip in two rows in it to increase the intensity of the backlight. The line width in this case will be 35 mm, the strip is covered with a translucent film. Many craftsmen use this solution to create oval lines by sawing the profile in the right places.
- PC9 - another similar solution, but its width is already 5 cm. It is used for both flat and oval stripes.
- apply - baguette for ceilings, which can be used for light lines. The “universal” option has a width of 10 cm, and the “mini” one has a width of 5 cm. Suitable for both backlighting and multi-level structures and creating a floating ceiling effect.
These are the most common types, there may be other brands, but most often they have a similar design.
Mounting technology
To make light stripes on a stretch ceiling, you need to draw up a sketch of a suspended structure with the exact dimensions and arrangement of lines. It is easier to make options without intersections, they are much easier to assemble and you will need to cut the profile less. Next, follow the instructions:
- Markings are made on the surface of the ceiling in order to see the proportions and location of future lines. At this stage, you can make changes.
- If the system includes closed circuits of a not very large size, it is better to assemble them in advance and mount them on the base in finished form. Large elements are easier to put in place to control the position.
- Wall profiles are installed around the perimeter, they must be repelled when determining the level. For guidance, the easiest way is to stretch a few cords between opposite walls or use laser equipment, if available.
- If you need to lower the profile, then you can use a wooden block or a drywall profile for installation. But the easiest way to use hangers, with their help it is easy to set the optimal position of the light lines, focusing on the level of the wall profile.
- During installation, it is necessary to monitor the accuracy of the joints: if the joint is uneven, the lines will turn out to be crooked.
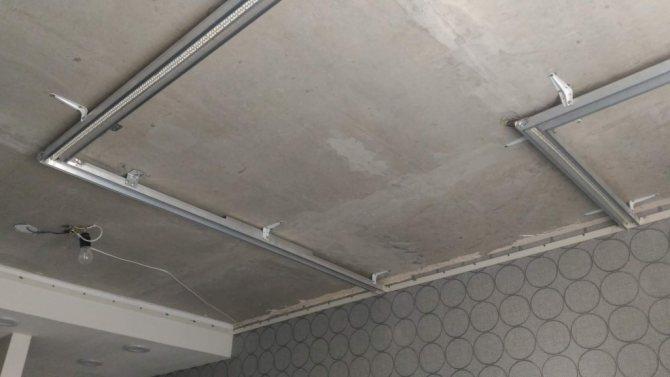
![Installation must be done carefully.]() Installation must be carried out carefully, checking the position of each element.
Installation must be carried out carefully, checking the position of each element. - After fixing the profile for the LED strip, you need to drill holes in the side partitions in order to stretch the wire through them.The LED strip must be cut to size in advance, focusing on the marks, and then solder a piece of copper cable to the contacts of such a length that it is enough for further connection.
- tape neatly glue inside the profile, then pull the cable through the hole and lead it to the location of the transformer. It can be placed both under a stretch ceiling and in another place, for example, on a closet. This will make it easier to replace if the power supply fails, most often it breaks first. You can put it on a cabinet or in a niche in the wall.
- After connection, the operation of the system must be checked. If the glowing strips turn on and off as expected, you can stretch the ceiling.
If needed join several pieces of LED strips, use a parallel connection.
What design is suitable for a stretch ceiling with light lines
It is best to apply light strips in modern interiors, as they fit perfectly into such concepts. With regard to specific premises, you need to remember the following:
- In the bathroom, you can make a wide strip around the perimeter to use it as the main lighting. Or come up with a composition that will give a fairly intense light.
- For corridors and hallways, this solution can also be used as a replacement for traditional lamps. In narrow rooms, just put a wide strip in the middle, it will be enough for normal lighting.
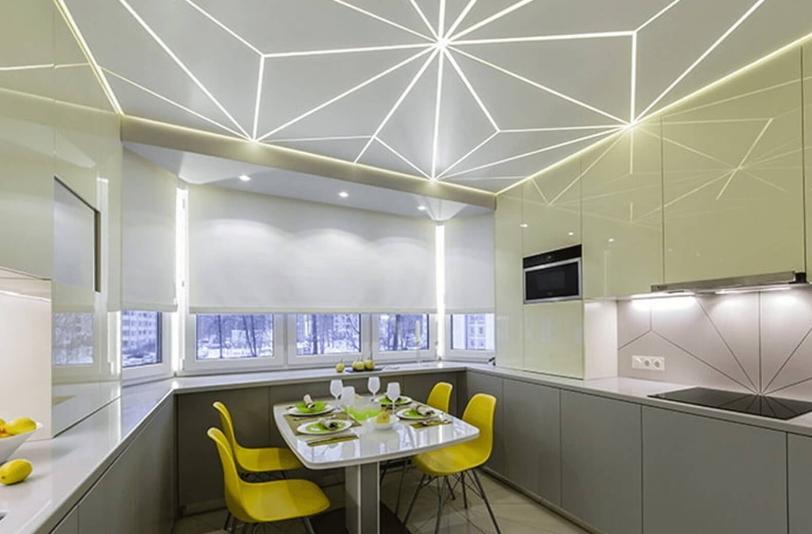
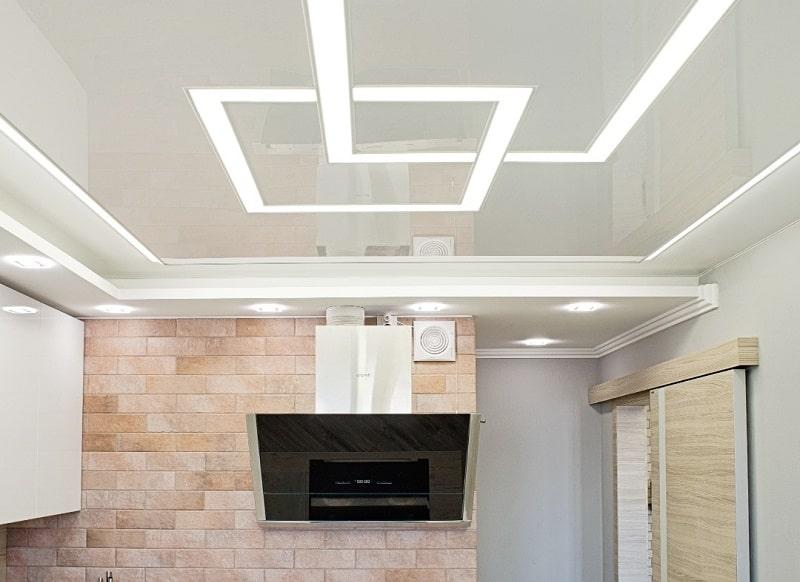
- In the kitchen, you can implement different ideas - from stylish lighting around the perimeter to lines in the middle. They are used for decorative purposes, but modern designers often place a wide strip above the work area to illuminate it.
![can replace the traditional chandelier.]() For the kitchen, light lines are perfect and can replace a traditional chandelier.
For the kitchen, light lines are perfect and can replace a traditional chandelier. - This option is ideal for the hall and living room, with its help you can realize any ideas, the main thing is not to choose too complex projects that will be difficult to assemble.
- In the bedroom, using lines, you can create a subdued backlight that will allow you not to turn on the main light unnecessarily.
By the way! It is easier to look for interesting ideas on the Internet.
To consolidate the information, we recommend 2 videos.
Video tutorial 1: Installing intersecting rhombuses - light lines.
Video lesson 2: An interesting variant of light lines passing from the ceiling to the wall.
Making light lines on a stretch ceiling is much easier than it seems, if you understand the process well. The main thing is to buy a profile for these purposes, set it exactly on the surface and connect the LED strip correctly.