How to repair LED lamp yourself
To repair LED lamps, you do not need to be qualified as an electronic engineer and purchase expensive equipment. It will not be difficult to organize work at home, if you first prepare everything you need and deal with the features of the fixtures. The main thing is not to rush and do everything carefully, in compliance with the recommendations from the article.
What to do if the LED lamp is broken
Today, there is a huge amount of lighting equipment made using diodes on store shelves. The cost has become affordable, moreover, there are many cheap options. For all their advantages, they are unreliable and fail very often, especially if there are power surges and power outages.
After a breakdown, check the equipment first. If it has traces of melting, most likely it will not be possible to repair it. Items that are physically damaged cannot be returned. If they are dropped or broken, it is easier to throw away the lamp than to repair it. It is important to turn off the lamp or chandelier at the first sign of a malfunction, in which case the probability of a successful repair is many times higher.
Can it be repaired at home
Repairing LED fixtures and lamps is a simple job if you understand the design features. The process is simplified by the fact that the device for all varieties is the same, they consist of the same components:
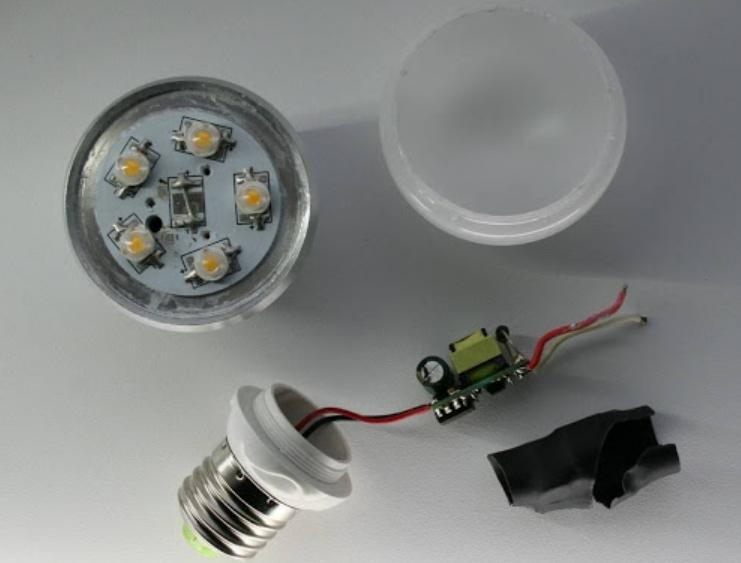
- Lamp body. The supporting part of the structure, in which all the main parts are located. It can be of different shapes and sizes, it all depends on the model. It is most often made of plastic, but can also be made of metal. If we talk about light bulbs, then there is a base made of ceramic, heat-resistant plastic or metal. There are different types of socles, it all depends on the standard.
- Driver. The main operating unit, which is responsible for power, compensates for power surges and converts AC to DC, supplying it to the LEDs. There are two options - capacitor, which are cheaper and are used in budget models, and electronic, they are more reliable, but more expensive.The equipment is designed for temperatures from -40 to +70aboutC, has good efficiency, but it is the most vulnerable part of the design.
- Circuit board. It contains LEDs and other necessary working units. Most often it is made of aluminum - a durable material that removes excess heat well.
- Diodes provide light. The more of them are installed on the board, the brighter the lamp or light bulb. The most common are SOW and SMD chips.
- There are wires from the driver to the bulbs, they can be soldered or connected with terminals. Depending on the brand of the lamp and the functions available to it, from 1 to 12 wires can fit one bulb.
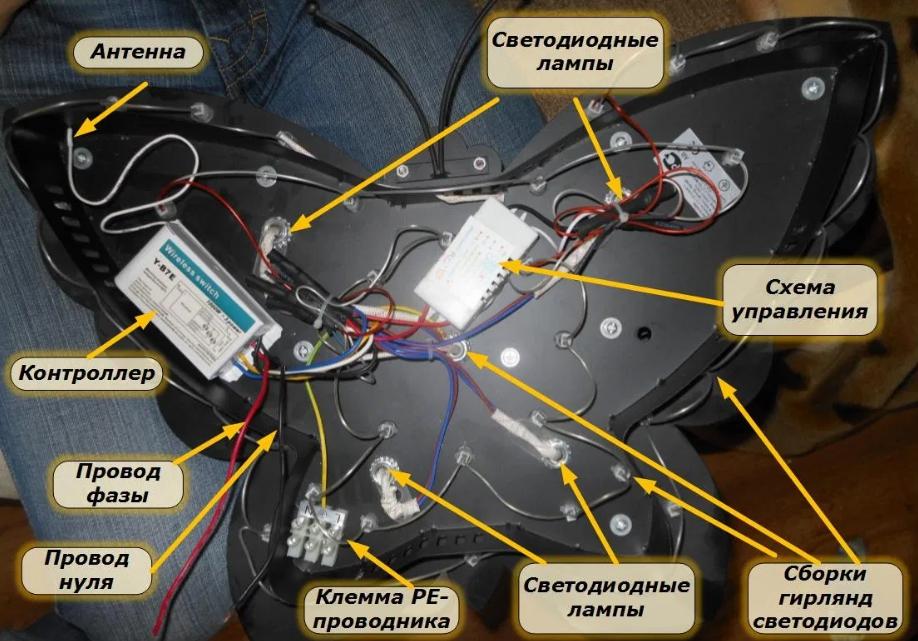
- If the chandelier is remote-controlled, it will have an antenna, a control unit, a voltage regulator and modules responsible for automatically setting up the equipment.
The package may vary. For example, in cheap lamps, transformerless capacitor-type power supplies are installed. They serve as current and voltage limiters. Ideally, it is better to find instructions with a lamp diagram, usually it is on the package or leaflet.

Types and main causes of breakdowns
If there are problems with the LED lamp or light bulb, it is impossible not to notice. Variants of malfunctions can be different, but the most common are:
- The light is completely gone. This can happen both when turning on or off, and during operation.
- Lighting can disappear at any time and resume after a while. Moreover, the time intervals can be anything.
- Flickering light bulb or lamp.The intensity can be different, but changing the brightness creates discomfort for the eyes.
- Flashing - when the light blinks every second.
- Structural damage due to impact or moisture entering the system (for example, due to condensation or if neighbors flooded the apartment from above).

If there are only a few types of malfunctions, then there are many more reasons. Most often there are such problems:
- Overheating of the nodes and their deformation or broken contacts. Diodes do not heat up much (up to about 30 degrees). But if the room is hot, then the temperature under the ceiling can rise to 50-60 degrees, and under such conditions, contacts are broken, parts fail and individual elements on the board peel off. Also, the problem occurs when the cooling radiator becomes covered with dust over time or the lamp is located in a place with poor ventilation.
- Violation of the recommended rules for the use of LED equipment. Together with a lamp and a chandelier, there are always operating conditions under which the manufacturer guarantees long work. Any deviations increase the risk of malfunctions at times.
- Diode burnout caused by power surges or capacitor failure. This is typical for inexpensive models.
- Various violations when connecting and installing equipment. Short circuits and other network failures can cause breakdowns.
Important! The cheaper the product used, the more likely it is that even the slightest deviation from the norm will lead to a malfunction.
Do not forget about factory marriage, it is much more common than in other types of lamps.Especially often flaws occur in lamps with a remote control, since the design is complex, and the technology is often not yet fully developed.
Preparation for repair and what is required for this
You need to prepare everything you need for work. Some items may be on hand, others will have to be bought, but it will not cost much. List of tools and fixtures:
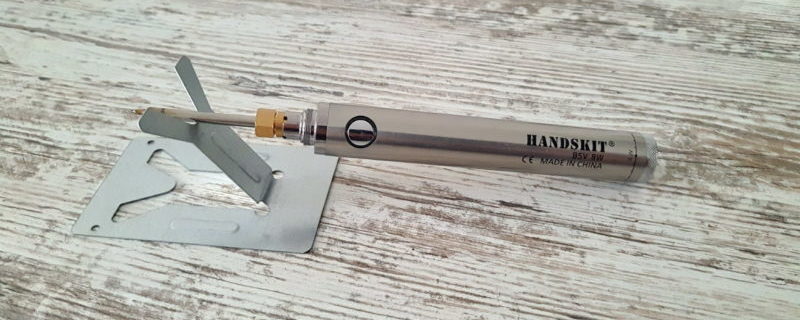
- A small soldering iron with a small tip. The contacts in the lamps are small, so the standard version will not work. It is best to buy a special model with different types of tips (flat and point). Do not forget about materials for soldering - solder, rosin, etc.
![Soldering iron with usb charger]() Soldering iron with a thin tip and usb charger
Soldering iron with a thin tip and usb charger - A set of tweezers. The tool store sells sets of tweezers for small jobs, there are devices of suitable shapes and sizes.
- Holder for a lamp or other node (the so-called "third hand"). A good solution is a fixture with a magnifying glass to make the job easier. You can adapt improvised elements - cut off a plastic bottle or pick up something else.
- Small gas burner. Suitable models from tobacco shops, which are used to light cigars. If you can’t find such a device, buy the so-called “turbo lighter”, which does not go out from the wind.
- A set of screwdrivers of different sizes to remove and disassemble the lamp. Most often, Phillips-head screws are used as fasteners.
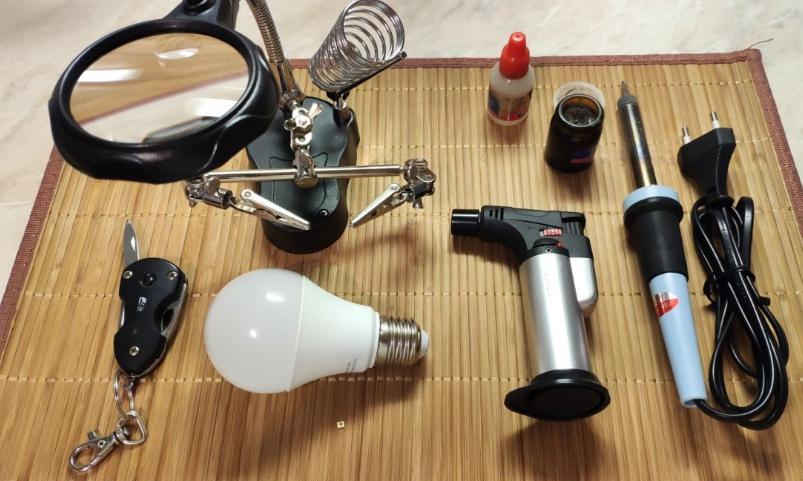
Some fixtures use hex head screws, so a set of wrenches may be required.Repair of LED lamps is a meticulous work, as there are many small parts in the products, and if handled carelessly, they can be damaged.
How to fix it yourself
Repair of diode lamps will save significant funds, since workshops most often take half the price of equipment for this work. Light bulbs can also be made if you have the right spare parts on hand.
Lamp
Ideally, you need to have an equipment diagram at hand, so when buying, you need to find it (on the package or in the instructions) and save it so that it is not lost. This will greatly simplify the work and help to understand the design much faster. Repairing options without a remote control is much easier, you need to remember the following recommendations:
Remember! Before starting work, turn off the power supply in the panel.
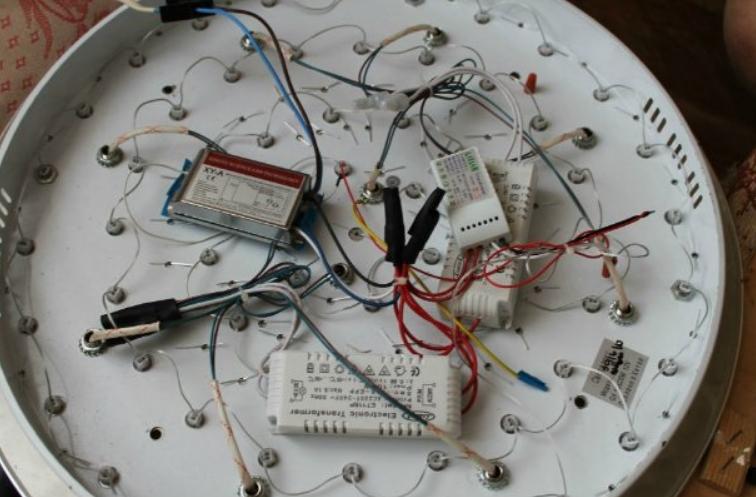
- Remove the lamp from the ceiling, after disconnecting the contacts. If there is a lot of dust on the upper part, you need to carefully remove it so that no debris gets inside during disassembly. Next, you need to disassemble the case to open access to the internal elements.
- Carefully inspect the parts for damage and defects from overheating, especially contacts and connections. Often times they cause problems. Repack the terminal blocks, as well as the twists, tighten the screws.
- If no problems were found, proceed to inspect the lamps or blocks if the relays and LEDs are located on the same board. The unit is connected to 12 or 24 V (depending on the rating of the elements), all LEDs ring with signs of damage or malfunctions.
- You can do it easier - turn on the light module in the network through the power supply and close the contacts on each LED in turn. Do this until the lamp lights up when the burnt element is found.
- LEDs in lamps are replaced only with elements of the same value, so it is better to order them in advance, as there may be problems with the purchase. If you install a jumper in a system that includes less than 10 light elements, then the capacitors will fail due to overload. Ideally, do not use jumpers at all during repairs, but if the board consists of several dozen diodes, you can close the contacts of one with a piece of wire, after removing the old element and cleaning the soot.
- If everything is in order with the LEDs, the board is checked for burnouts, the integrity of the tracks. It is also worth inspecting the capacitors, if they are dark or swollen, replacement is required. Due to overheating of the matrix, the contacts may be broken, they should also be checked carefully and soldered all in which there are doubts.
- If damage is found in the control unit, it is worth replacing it with a similar one. Pay attention to the characteristics of the part, do not confuse the wires when connecting.
- Before installing the board in place, it is necessary to update the thermal paste layer, if it was in the place where the cooling radiator was attached. Gently wipe the old one with a damp cloth, degrease the surface, apply a thin layer of the new composition, evenly distributing it.
Note! You can buy thermal paste at any computer store.
It is not difficult to repair a chandelier if you understand the principle of its operation.Most often, the problem is the LED burnout, because they are connected linearly and when one element fails, the circuit is broken. By the same principle, it is worth looking for faults in tape lights. If the inspection did not reveal a burnt element, you will have to ring everything in order.
Video: Repair of a 36 watt LED ceiling lamp.
LED lamp
If a standard lamp fails, the troubleshooting methods do not differ from the option described above. But there are some peculiarities that should be taken into account. To find the problem and quickly fix it, you must follow these instructions:
- First you need to make sure that the problem is in the light bulb. To do this, unscrew the faulty one from the cartridge and put a working one in its place. If it does not light up, then the problem is in the power supply. Inspect the contacts in the cartridge. If they are dark, most likely the cause is a loose pressure, you need to clean the surface of soot, bend the antennae. The connecting block of the ceiling lamp or a broken switch may also be to blame.
- If the control lamp lights up, proceed with the repair first. First you need to remove the diffuser, most often it is held by a thin layer of sealant, so if you carefully turn the connection, you can rip the element from its place. If it holds, then use a thin screwdriver to squeeze the connection in several places. When this method did not help - warm up the joint with a hairdryer, this usually provides a hassle-free removal.
![The main thing is not to damage the parts during disassembly.]() The main thing is not to damage the parts during disassembly.
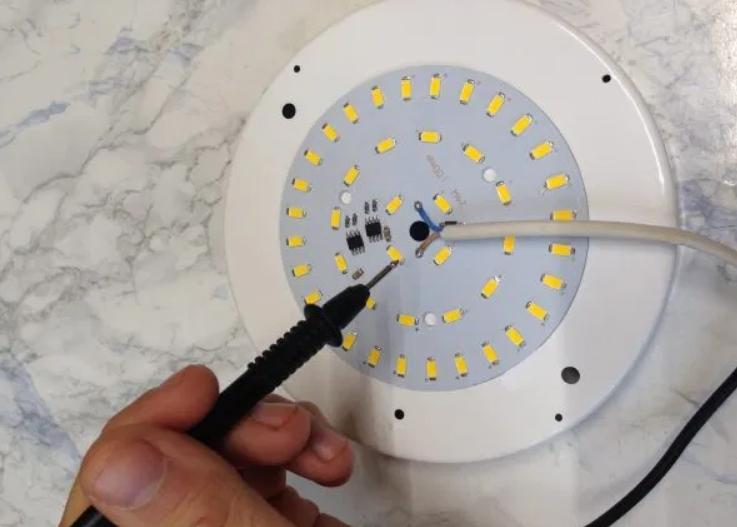
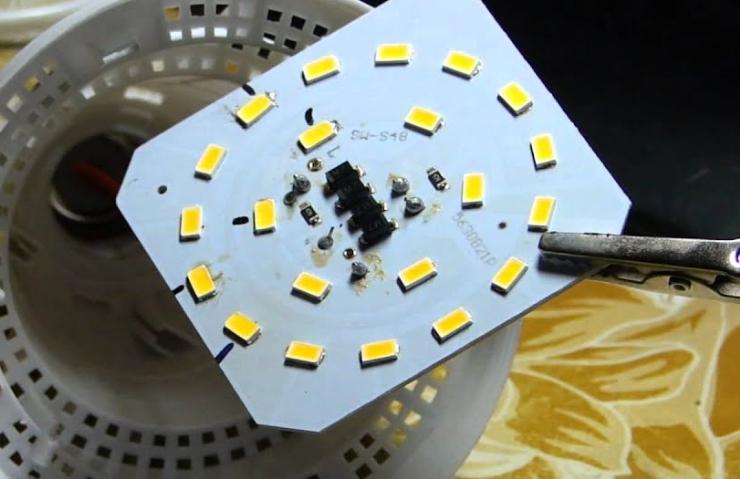
The main thing is not to damage the parts during disassembly. - A board with LEDs is fixed on the platform under the diffuser, it must be removed. To do this, first unscrew the screws holding the part, and then separate the contacts on the board.You need to take hold of the wire with tweezers, and melt the tin with a soldering iron, carefully straighten the end in order to remove it later, do the same with the second contact. Remember the location or color indication on the insulation so as not to mix up the wires.
- Remove the board and inspect it. Usually, a burned-out LED can be seen immediately by dark dots or soot on the reverse side. But for reliability, you need to ring the circuit with a tester. Sometimes two elements burn out, if this is not found out right away, you will have to redo the work twice.
- If all the LEDs are in order, the driver, which is located under the board in the lamp housing, most likely failed. You need to buy it or take it from the same lamp.
- In the case of a burned out LED, you should remove it correctly. The board is fixed in the holder or in any way so that it can be accessed from both sides. You need to clamp the damaged element with tweezers, and heat the board on the reverse side at the junction with a gas burner for 2-3 seconds. Pull the tweezers towards you to remove the diode, do everything carefully.
- Instead, you should put an LED with the same characteristics. First, gently apply a little solder with flux to the installation site, or lubricate the contacts with acid. Correctly install the LED (a large contact is always a minus), warm up the board for 2-3 seconds on the reverse side with a burner and gently press the diode so that it snaps into place. Wipe the cooled connection with alcohol.
- It is best to wipe off the thermal paste from the surface of the cooling radiator and apply a new one. Next, carefully place the board by threading the wires through the holes, then solder them into place and tighten the retaining screws. Check light bulb operation. If it is off, ring the LEDs again.
- Remove the remnants of the old glue from the ceiling, if any. Apply a thin layer of silicone sealant, press the elements together and leave for several hours to dry.
Advice! It is best to find the same faulty light bulb in order to take the necessary spare parts from it.
It is easier with light bulbs than with lamps, since their device is always the same. The repair is simple, the main thing is to do everything carefully, do not overheat the board with a burner and observe the polarity of the diodes when soldering. There are no other requirements.

More details in a separate article: How to repair an LED light bulb yourself
Troubleshooting remote control lights
This type of chandelier is much more complicated than conventional models, so it needs to be repaired differently. If the equipment does not turn on, the first thing to do is to replace the batteries in the remote control, often this is the problem. If the replacement of the batteries did not work, then carry out the repair as follows:
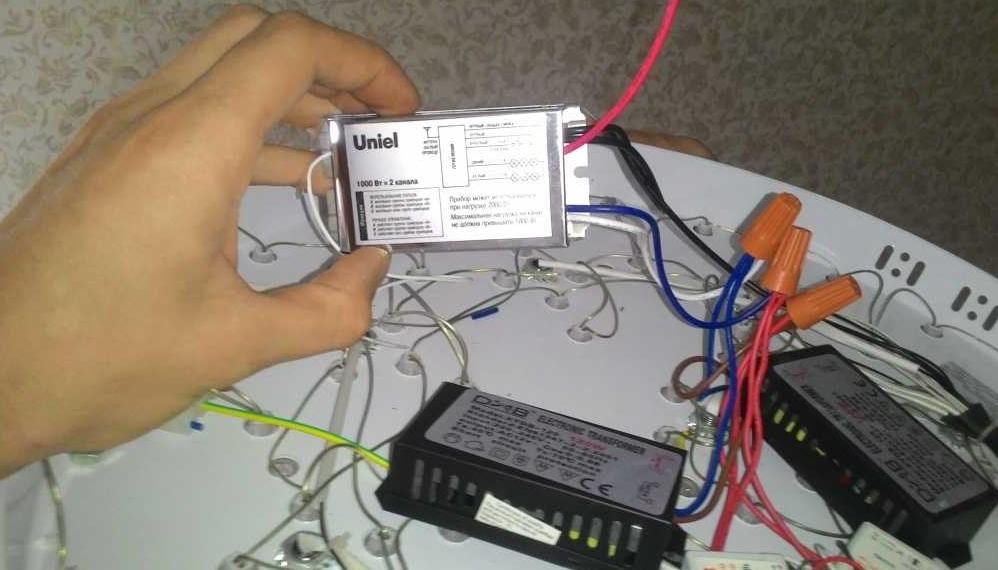
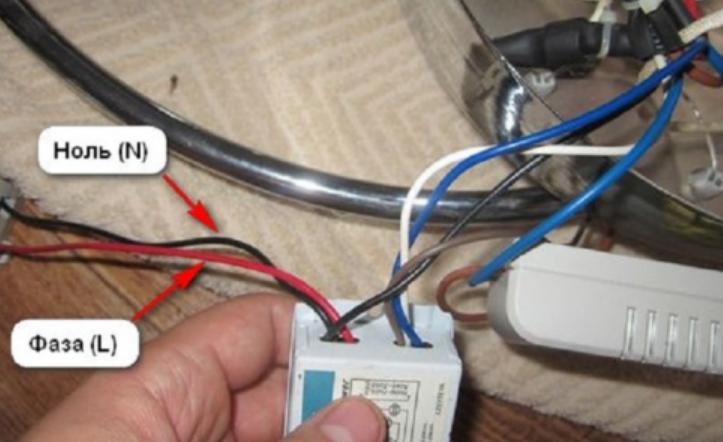
- Carefully remove the chandelier from the ceiling and prepare for inspection. First, select a power supply with a suitable voltage and connect to the contacts, and then turn on the equipment with the remote control. If it works, then you should look for a problem in the wiring. When the chandelier did not turn on, but a soft click was heard, the controller is most likely working.
- The driver is easy to check, for this you need to disconnect it from the controller and apply voltage directly. If the lamp works, then the problem is in the controller. When the light did not appear, you need to buy a driver. They have approximately the same characteristics, the main thing is to take into account the number of control channels.
- When there is no driver, but you need to use a chandelier, you can disconnect the wires of the lamps and drivers and directly connect them to the terminal block. Then you will use the equipment from a standard switch on the wall.
- Search for other faults should be carried out in the same way as described above, there is no difference in replacing the LEDs.

If the remote does not work, only its replacement will help.
Do-it-yourself repair of LED lamps is within the power of any person who understands the simplest circuits and knows how to use a soldering iron. The main thing is to be careful and not use parts that do not match the characteristics of those that are out of order.