Chandelier wire connection diagrams
Ceiling chandeliers in residential and office premises perform not only the role of lamps, but also perform an aesthetic function. Leaving aside beauty issues, the purpose of writing this review is to analyze the technical side of connecting lighting fixtures.
Preparing to connect
Before starting work, it is necessary to firmly master the principles of safe work:
- any electrical installation is carried out with the voltage off;
- the presence of voltage is checked directly at the place of work, since the wrong switch may be turned off by mistake.
You can only briefly apply power to the circuit to find the phase wire.
The rest of the preparatory work boils down to:
- shortening the cable coming out of the ceiling to the desired length;
- removal of the outer sheath of the cable in the required area;
- stripping the ends of the wires from insulation.
After that, you can begin work on hanging the chandelier and connecting it to a 220 volt network.
How to find the phase
In most cases, the chandelier is connected to existing wiring, and, usually, it is done in a hidden way. Before connecting, you will need to find a phase wire. If you plan to connect a lamp with incandescent lamps, then phasing is not critical, but for safety, you should make sure that the switch breaks exactly the phase wire. If to be connecting led chandelier or a lighting device with a halogen lamp, this can be decisive for the performance of the lamp. Although this does not happen as often as it is believed, in the vast majority of cases there is a rectifier at the input of the driver or electronic transformer, for which phasing is not important.
On the ceiling
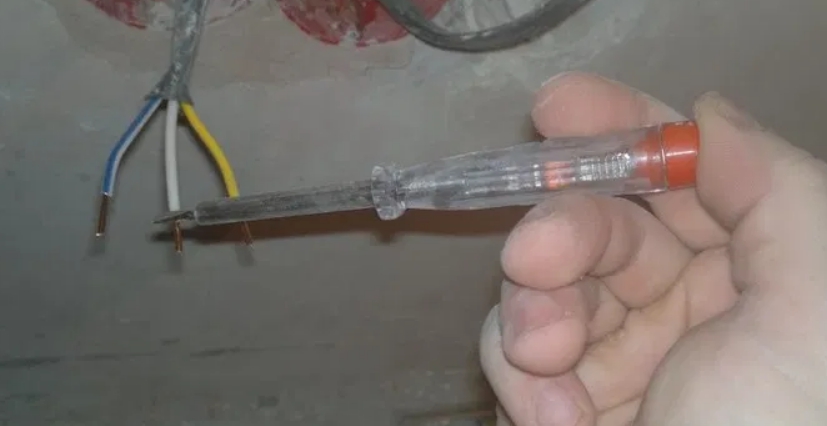
To find the phase wire on the cable brought out of the ceiling, it is necessary to temporarily apply voltage to the lighting network and turn on the wall light switch. Next, you need to touch the core of each conductor with an indicator screwdriver. Where the indicator lamp lights up, there will be a phase. With the help of a multimeter, you can finally verify this - between the found phase and the second wire (zero) there will be a voltage of about 220 volts.
Important! If 3 or 4 wires come out of the ceiling, then two conductors may turn out to be phase conductors. Therefore, the indicator must check all the wires.
in the chandelier
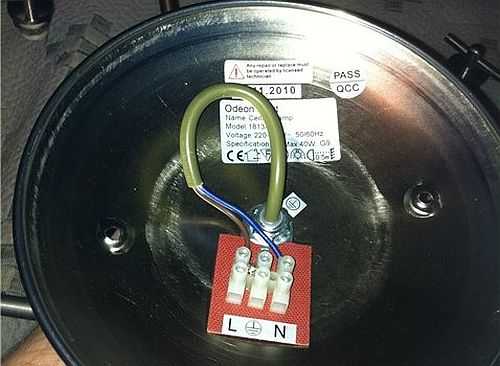
The terminal block of the chandelier is usually marked. Terminals are marked with letters:
- L - for connecting a phase conductor;
- N - under the neutral wire;
- PE or grounding sign - protective grounding.
If there is no marking, you need to pay attention to the color of the wire insulation. Usually, the same standards apply for internal wiring of chandeliers as for external ones:
- phase wire may be marked in red, brown or white;
- null - blue or light blue;
- protective earth - yellow-green.
If all the wires are the same color or a different coloring is applied, you can trace the connection of the wires. The protective conductor is connected to the body of the luminaire, and, most likely, next to the terminal block. If an electronic transformer is installed in the chandelier or driver, you can track which of the wires is connected to the L terminal and which to N. If you can’t trace the connection of the wires, you can call them with a multimeter. The rationality of this lesson, everyone determines for himself - in 99+ percent of cases, phasing will not affect the performance of the lamp (except for the PE conductor - if present, it must be identified without fail!), and safety is ensured by the correct connecting a light switch.
Connection diagram depending on the number of wires
Depending on the wiring done earlier, from 2 to 4 wires can come out of the ceiling. The connection scheme may be different.
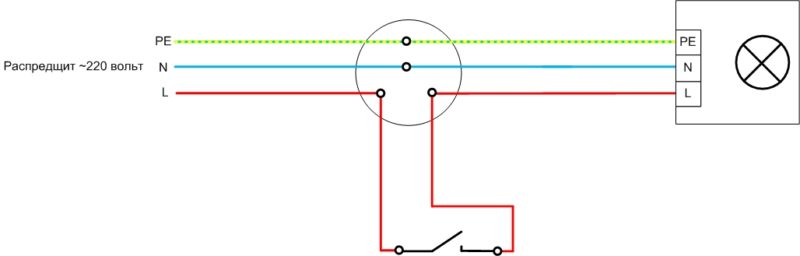
2 wires
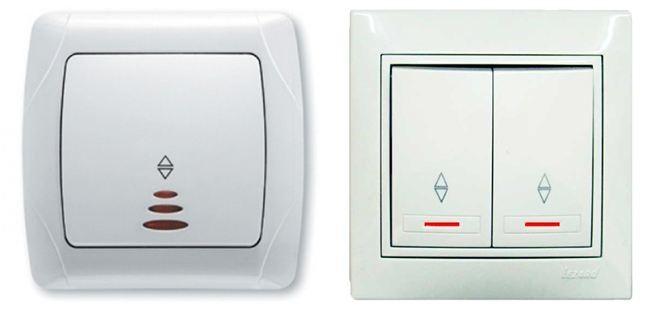
The easiest option. Such a scheme assumes:
- single-key switch (or double is used as a single one);
- no PE conductor.

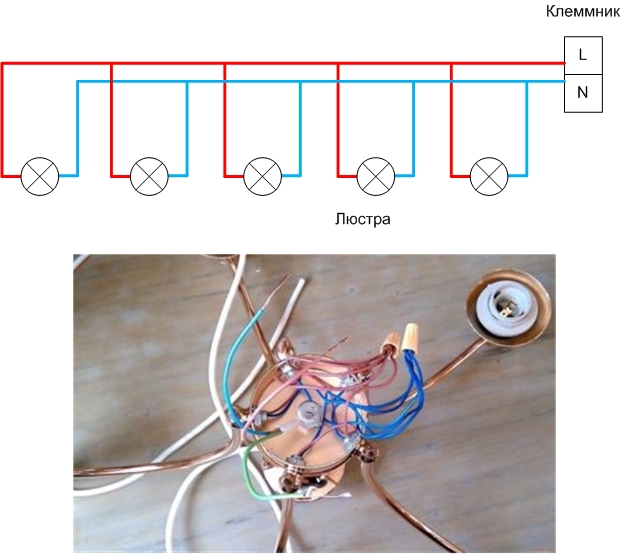
To connect the chandelier, you need to make sure that the switch breaks the phase conductor, and also find the phase wire on the ceiling. But this is not necessary for the reasons mentioned.In this case, even if a multi-track chandelier is used, all the bulbs can only be controlled simultaneously. If the luminaire contains several lighting elements and the wires from them are not brought out to the terminal block, they must be connected: phase conductors to phase conductors, zero to zero. You can connect the wires by twisting followed by soldering, screw or clamp terminals.
3 wires
In the case of 3 wires, there can be two circuit options.
Method number 1
In TN-S or TN-C-S systems, a PE conductor is present. In this case, the circuit is almost the same as the previous one, with the exception of the ground wire.
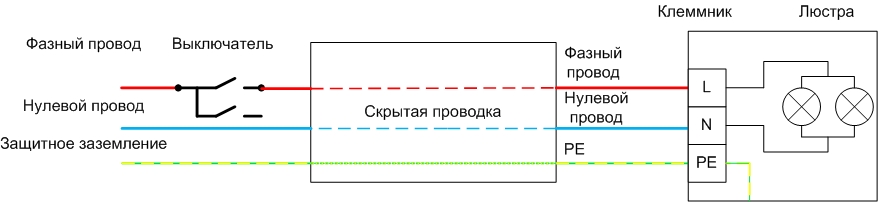
You can determine the purpose of the wire by color coding. If it is not there, then the phase wire is located using an indicator screwdriver (this must be done even if there is multi-colored insulation). It will not work to distinguish the neutral conductor from the protective one with a screwdriver, the multimeter is also of little use - both of these wires are galvanically connected to each other. The only way out is to ring the conductors from the place where they can be identified to the exit from the ceiling.
Method number 2
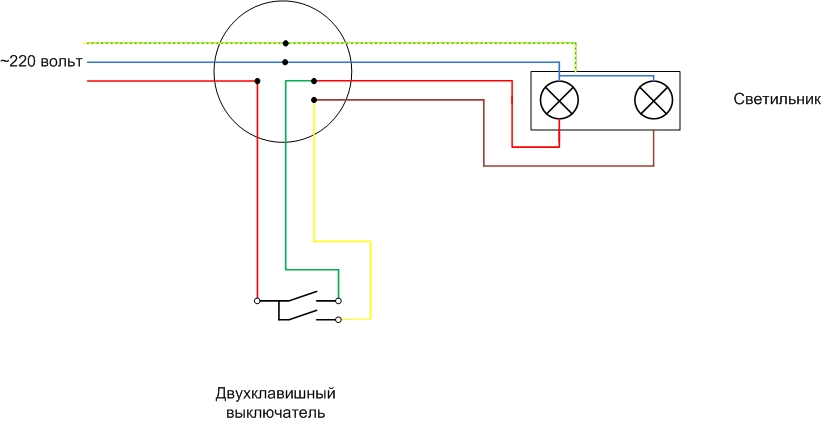
In a non-protective earth (TN-C) system, the three conductors most likely suggest a two-gang switch.
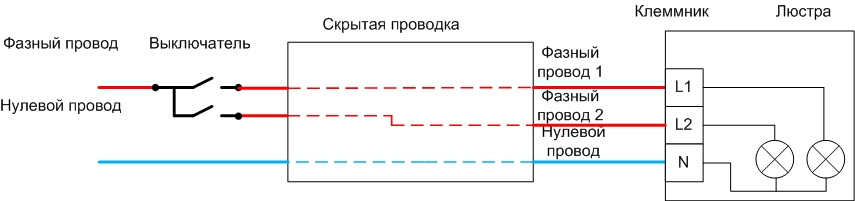
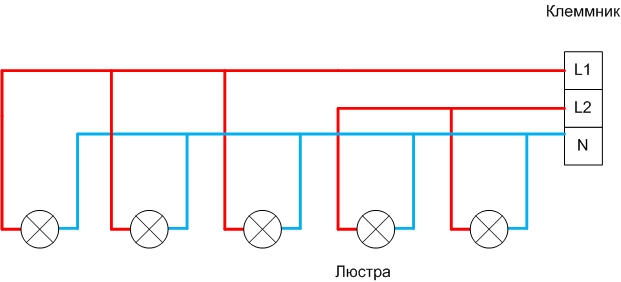
The conductors of the N elements of a multi-track chandelier are interconnected, the phase conductors are divided into two bundles, which can be controlled separately.
4 wires
If 4 wires come out of the ceiling, then the connection diagram of a multi-track chandelier assumes:
- two-gang switch;
- the presence of a protective conductor.
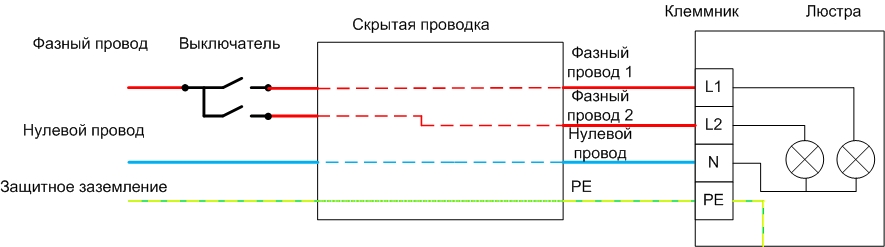
Otherwise, there are no differences from the previous version, and you can group the lamps inside the lamp in the same way.
A rather rare option is possible that four wires mean the presence of a three-gang switch, but this is not much more complicated than the double option, it is irrational to consider it separately.
Step-by-step instruction: How to connect a lamp to a triple switch
Switch connection
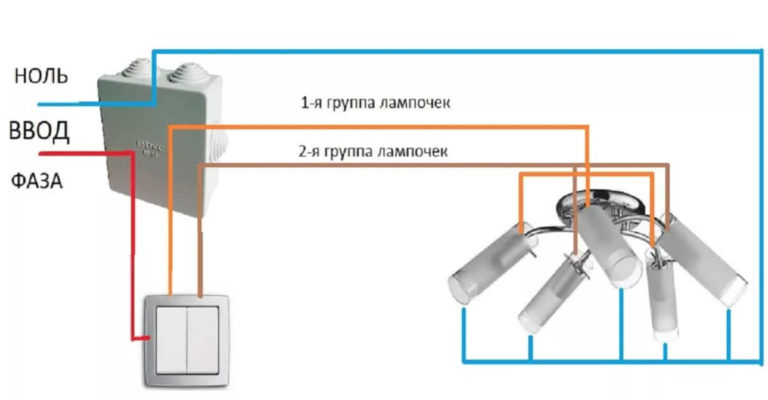
In most cases, the chandelier is connected to the switch by means of a junction box - the cables are brought into it, cut and connected according to the selected scheme. The general principle of implementation is as follows:
- a cable from the switchboard enters the box - 2 or 3 cores, depending on the presence of a PE conductor;
- wires N and PE go through the box in transit;
- a gap is formed in the phase wire, into which the switch is connected;
- if a two- or three-gang switch is used, then the phase wire is divided into the corresponding number of branches.
A cable is lowered to the switch, with a number of cores equal to the number of keys plus one. Lighting networks are made with a cable with copper conductors with a cross section of 1.5 sq. mm.
Single
If the chandelier is connected to a single-key switching device, then a cable of two cores is included in the gap of the phase wire. Zero and protective wire go through the box to the lamp.
More detailed article: How to connect a light switch with one key
double
This option will require an increase in the number of cores in the cables:
- a cable with three conductors is lowered to the switch;
- There are four conductors going to the chandelier.
If there is no protective grounding, then it is enough to lay three wires to the chandelier, and four to the switch.
Read also: How to properly install and connect a double switch
Correct connection to the chuck
Different cartridges can be used in the chandelier - with Edison thread, plug-in, etc. In most cases, the phasing of the connection of conductors to the cartridge is not important for the performance of the lighting device. But for safety reasons, the threaded chuck a phase conductor must be connected to the central contact, and to the side contacts - zero. The logic is this: if an electrician, in violation of safety rules, performs any operations inside the cartridge under voltage (bending contacts, cleaning plastic parts, etc.), then the risk of accidentally touching the side contacts with a screwdriver or other tool is much higher. It would be better if this unfortunate electrician touches the neutral wire. Otherwise chuck connection has no special features - the stripped wires are inserted into spring clips or clamped into screw terminals located in the back of the cartridge. And it is also important not to exceed the power of the lamp for which the cartridge is designed. This may cause it to overheat.
| Cartridge type | Voltage, V | Maximum load current, A (Power, W) |
|---|---|---|
| E27 ceramic | 220 | 4 (880) |
| E27 plastic | 220 | 0,27(60) |
| G4 | 12 | 5(60) |
| G9 | 12 | 5(60) |
Features of connecting a Chinese chandelier
The electrical part of lamps produced in Southeast Asia is often characterized by:
- underestimated cross-section of conductors;
- the use of unknown alloys instead of copper for the manufacture of conductors;
- low quality insulation of wires and terminal terminals (inelasticity of the material, reduced thickness, reduced insulating properties).
The first two points can lead to excessive heating during operation and an even greater deterioration in the quality of the insulation, its cracking and shedding. This can be avoided periodically. removing the chandelier and its examination, but hardly anyone will do it at home. Therefore, it is necessary at least before installation to check the quality of the insulation of the wires. For this you need turn out the lamps incandescent or disconnect power supplies for halogen and LED lamps and measure the resistance between each core and the housing. It must be endless. It is even better to make a measurement with a 250 or 500 volt megger. If the insulation resistance turns out to be low or zero, you must return the Chinese chandelier to the seller or replace the conductors yourself with better ones.
Still haven't figured it out! Then watch the video.
Common mistakes
Often, inexperienced electricians lower the zero to the switch along with the phase conductor, and then ask questions about where to connect it. In fact no need to pull the neutral wire to the switch. And even more so, it is not necessary to break it with a switching element. It must go through the box in transit, be laid parallel with earth conductor.
Another common mistake when connecting a double switch is to connect the phase conductor not to a common terminal for two contact groups, but to one of the outgoing ones. In this case, only one group of lamps will light. This error is easy to spot and correct.
The rest of the errors that lead to the inoperability of the lighting circuit, in most cases, occur due to inattention, and are associated with incorrect connection of electrical wires. To eliminate such problems, it is necessary to check the scheme more often (especially in the absence of experience).
Otherwise, connecting a chandelier with knowledge of the minimum basics of electrical engineering should not cause problems.