How to connect a light bulb holder to wires
Connecting the cartridge to the wires is not difficult if you know the design features and follow the simple instructions. There are several main types of products, so the fasteners may vary. But to understand this is not difficult if you study the device of cartridges and understand all the nuances of installation.
Types and marking of cartridges
All varieties currently used can be divided into two groups - screw and pin. The first option involves screwing the light bulb along the Edison thread, the second - snapping special pins into the seat. Requirements for quality and performance are prescribed in GOST.
Screw cartridges are marked with the letter "E", the number indicates the diameter of the threaded part. Most often, one of three varieties is used:
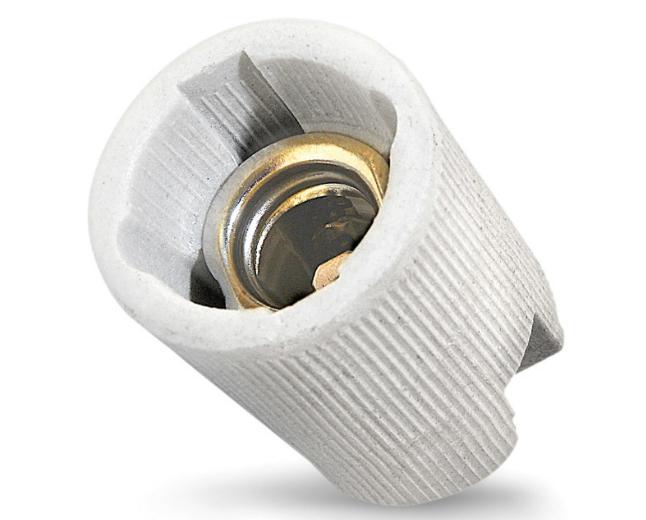
- E14, popularly called "Mignon". A narrow base, designed for low power lamps, is used in most new chandeliers.Ideal for LED light sources and incandescent lamps up to 60W. The lamp power limit is usually 440 W at a current strength of not more than 2 A.
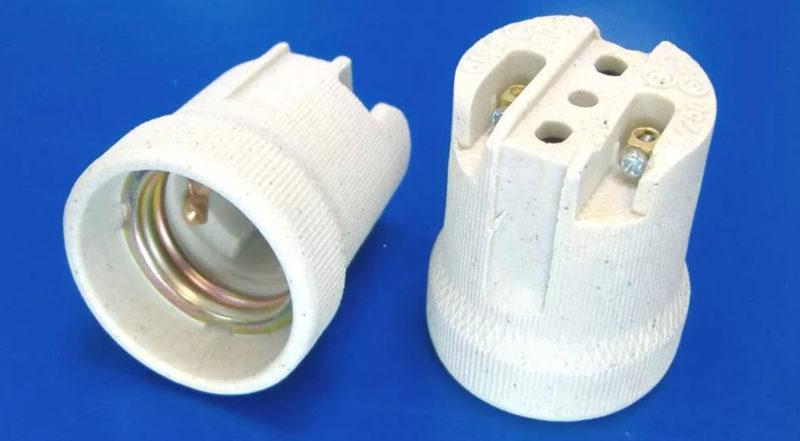
![]() Ceramic cartridge E14.
Ceramic cartridge E14. - E27. The most common option for today, which was previously placed in all types of fixtures. Designed for standard incandescent lamps, you can put any other options with the appropriate base size. The maximum power of light bulbs for this type is 880 W at, the current strength is not higher than 4 A.
![How to connect a light bulb holder to wires]() E27 cartridges are the most common.
E27 cartridges are the most common. - E40. Made only of ceramics, designed for street lighting and can be used with lamps up to 3500 W and current up to 16 A.
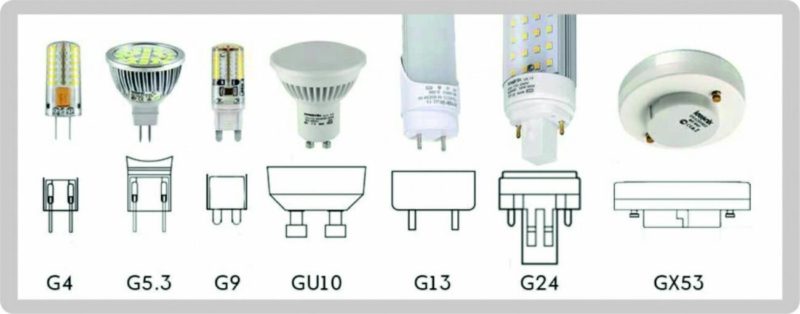
Pin or pin cartridges differ in that the lamps are not screwed into them, but inserted into the base and fixed by protruding contacts. They are marked with the letter "G", the number indicates the distance between the contact elements. Main varieties:
- G4, G5.3, G6.35, G8 and G10 have exactly the same design and differ only in the distance between the contacts. Suitable for compact halogen and LED bulbs, used in chandeliers and spotlights. Designed for light sources with a power of up to 60 W and a load current of not more than 5 A.
![Varieties of G-type pin bases.]() Varieties of G-type pin bases.
Varieties of G-type pin bases. - G9. Designed for light sources with flat contacts.
- GU10. It differs in that after inserting the contacts, they rotate a little and thus are fixed in the seat.
![How to connect a light bulb holder to wires]() Cartridge GU10 in the lamp.
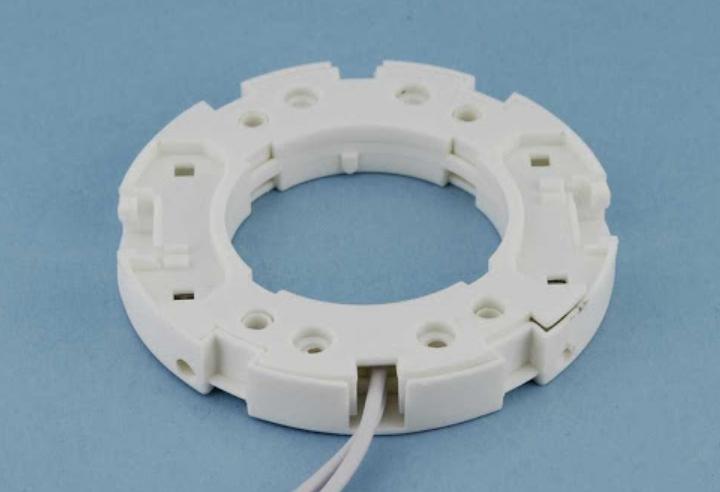
Cartridge GU10 in the lamp. - GX53. Flat cartridge, designed for installation in stretch ceilings and suspended structures. Allows you to save space if it is limited.
![How to connect a light bulb holder to wires]() The GX53 flat chuck is different from the traditional ones.
The GX53 flat chuck is different from the traditional ones.

By the way! When choosing, you need to compare the actual characteristics of the cartridge with the standard ones, often they are an order of magnitude lower.
How to connect an electric chuck
The connection of the lamp socket depends on the type of fastening. There are several types, each has its own characteristics:
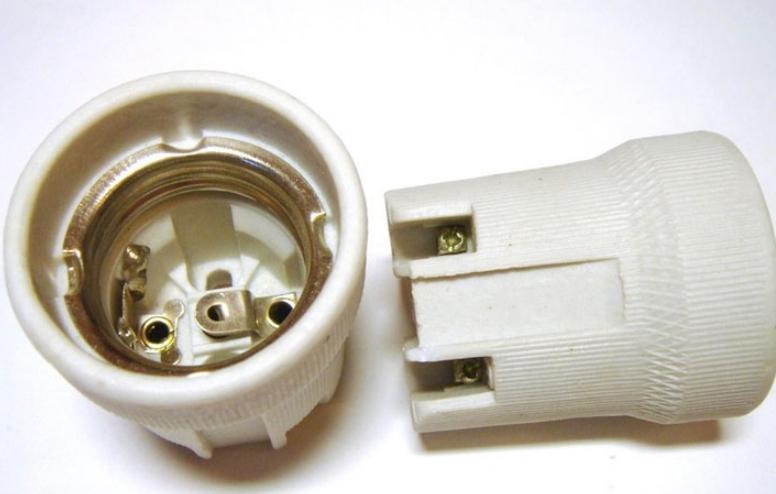
- Connection using screws. In this case, the central and side contacts are attached on one side, and the wire is connected on the back. To do this, its ends are protected by several centimeters and loops are made from them according to the size of the screws used. They are placed in their seats and pressed with fasteners in such a way as to ensure a secure fit and prevent the screw clamp from loosening over time.
![How to connect a light bulb holder to wires]() The screw clamp is simple and reliable.
The screw clamp is simple and reliable. - Connection of wires due to threaded terminals. This type is distinguished by the fact that the mount is already built into the cartridge body. You need to unscrew the screws to open the hole. The end of the wire is inserted into it, which is pre-stripped to the desired distance. When fastening, make sure that the wire is located exactly under the screw and is firmly pressed into the mounting hole. Clamp as far as it will go to ensure good contact.
![How to connect a light bulb holder to wires]() Type of cartridge with threaded terminals.
Type of cartridge with threaded terminals. - The connection in a screwless chuck is different from the previous ones. It has two pairs of slots inside which are spring-loaded brass clips. A pair arrangement is needed in chandeliers with several cartridges, since the voltage is supplied to one. The rest are connected in series with small jumpers. If the wires are stranded, it is difficult to insert them, it is best to strip the end about 10 mm long. Then they are tinned with a soldering iron, then inserting the wire is not difficult.
![How to connect a light bulb holder to wires]() Self-locking connection.
Self-locking connection.
If a soldering iron is not at hand, you can insert a stranded version with a small screwdriver or a nail of a suitable diameter. It is necessary to press the latch, place the wire next to it and remove the spacer in order to securely fix the contact.
If you need to remove the old cartridge and connect a new one, you may have problems removing the wire from the screwless terminal. If it is possible to insert a screwdriver or other thin element, you should do just that. When there is nothing suitable at hand, you need to take a good hold of the wire next to the mount and pull it towards you with moderate effort, while rocking it from side to side.
How to connect an outlet to a cartridge
If for some reason you need to be powered by a lamp and put in an outlet (for example, during repairs), it is important to do it right. To do this, the cartridge is disassembled and additional wires are connected to the contacts. The phase in the lamp socket should not come into contact with zero, therefore, for reliability, it is better to wrap the connection point with insulating tape.
This solution can only be used as a temporary solution. Do not connect equipment that consumes a lot of energy to such an outlet, as this will lead to overheating of the cartridge and its deformation.
From the video you will learn how to connect the cartridge to the wires and the outlet.
Ways of fastening electric cartridges in chandeliers and lamps
Most often, you have to connect nodes that are located in the lighting equipment. This imposes certain requirements depending on the mounting option and the design of the lighting device. The most commonly used methods are:
- Fastening a cartridge in a luminaire by a conductive wire is not allowed, since it is impossible for the load to fall on this element. The exception is the use of a cable in reinforced insulation, designed for certain loads. But still, hanging massive chandeliers in this way is not worth it. The light bulb socket is connected in the standard way. The wire is pulled through a hole in the back and fixed in a fixed position with a special screw located on the side. It must be twisted so as to secure the wire, but do not deform it.
- Installing the connection of the cartridge in chandeliers with a carrier element in the form of a tube is much easier. Here the load falls on the tubular element, inside which the wire is pulled, which makes the design much neater. The cable is pulled out with a small margin and attached to the cartridge as usual. In the upper part, it is connected to the mains through a block, the junction is closed by a decorative cap.
- The installation of a bulb holder due to the sleeve is used both in chandeliers and in wall lamps, as well as table lamps. To do this, there is a threaded element in the upper part, which is inserted into the hole and fixed on top with a nut of the appropriate size. It is best if the mount is metal, plastic loosens over time and cannot be repaired. Will only help complete replacementas these parts are not sold separately.
- Fixing variants with screwless terminals is even easier. This is a modern solution that has appeared recently, it is increasingly found in chandeliers.In this case, you first need to screw on the thread the lower part of the element through which the wire is passed, usually two-core. Then it is connected to the contacts and the upper part is neatly aligned with the latches and snaps into place. Such a system securely holds the element without additional fasteners.
If you need to remove a screwless chuck, you will need a thin flathead screwdriver. With its help, first remove one latch, after the second, and then carefully remove the upper part from the seat.
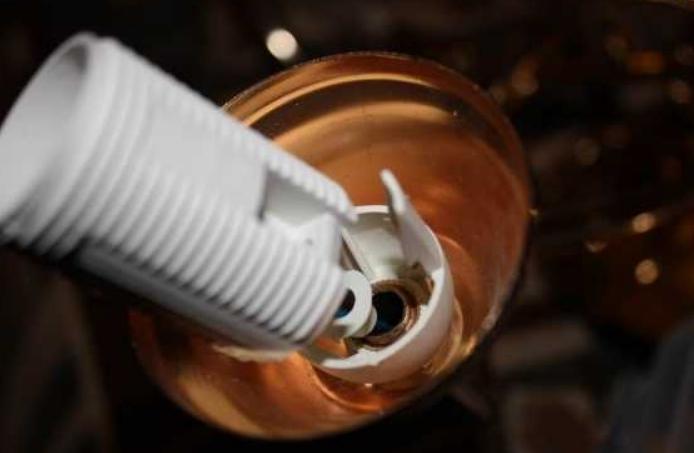
How to connect old-style carbolite cartridges
This is the most common option. The cartridge resembles plastic and consists of a bottom with a hole for the cable, a threaded body and a ceramic insert for connection. To do the job right, you need to remember simple tips:
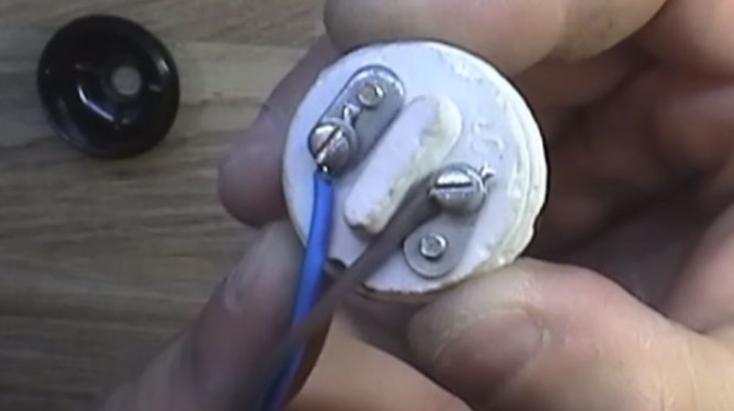
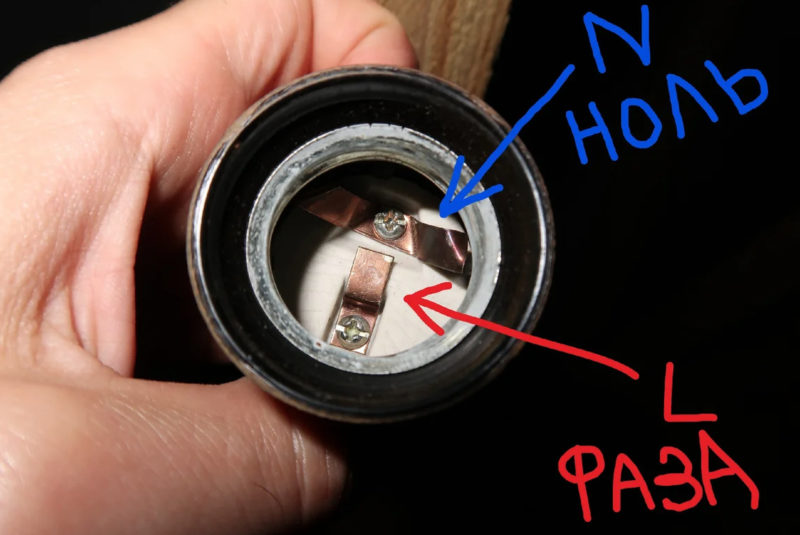
- It turns out which lived the phase, and which is zero. This is important for the safe use of lamps, you can check it with an indicator screwdriver. The phase is always connected to the central mount, this is for security reasons. Zero goes to the side contact. The main thing is to fix the ends of the cable securely and exclude contact between bare parts.
![How to connect a light bulb holder to wires]() It is important not to confuse the phase and neutral wire when connecting.
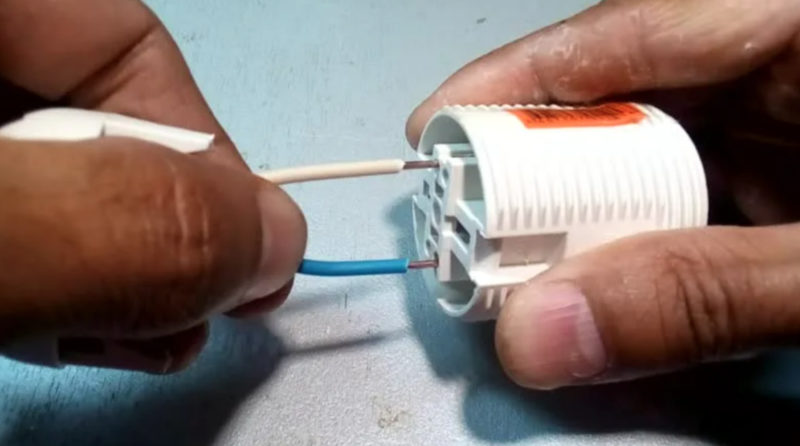
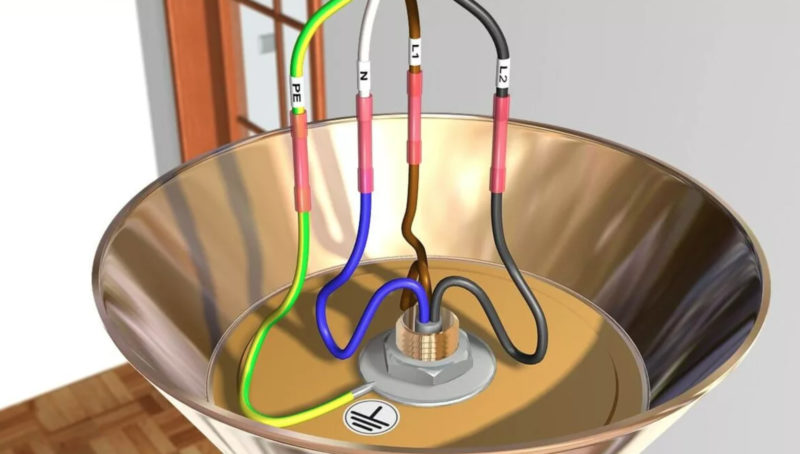
It is important not to confuse the phase and neutral wire when connecting. - If a three-wire wire is used for the connection, it is important to properly position the ground. Most often, on the body of the chandelier there is a place for its fastening, indicated by the corresponding icon. Since it is located to the side, the length of the ground wire must be much longer. If there is no fastener, the end is attached to any place on the body. Some ceramic cartridges have space for a third wire, making the job easier.
![How to connect a light bulb holder to wires]() The yellow/green wire (PE) is ground.
The yellow/green wire (PE) is ground. - To securely fasten the stranded wire, you need to prepare it. To do this, the insulation is removed from the ends and loops of a suitable size are formed. In order for them to maintain integrity and not deform, they should be processed with a soldering iron and the wires fastened. This will ensure good contact and maintain the connection even if the cartridge is removed several times.
According to this scheme, all collapsible options are connected, the design usually does not differ.
The video clearly shows how to connect the bulb holder to the PVA cable.
Common Mistakes
There are some basic mistakes that those who have little experience in connecting cartridges make:
- Installation of chandeliers before installing cartridges. It is much more convenient to do the work on the table and only then hang the equipment.
- Fastening of contacts of stranded wires without their tinning. This option is not reliable and contact inevitably deteriorates over time.
- Phase connection to side contact. This not only adversely affects the operation of the lamp, but also creates a danger to a person when replacing it.
- Often overlooked are the screws that hold the contact plates to the top of the ceramic insert. If they are not clamped well, the contact will be poor, which will lead to constant overheating of the cartridge during operation.
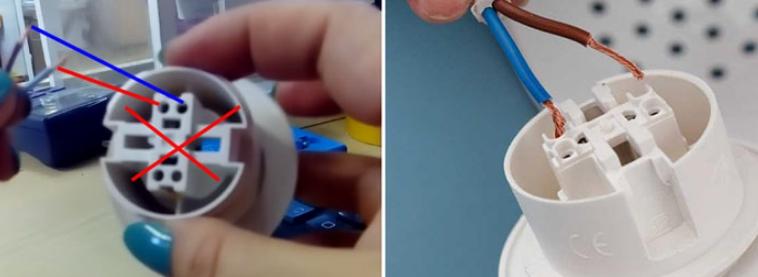
![How to connect a light bulb holder to wires]() Do not insert different wires into holes located nearby.
Do not insert different wires into holes located nearby. - Inserting neutral and phase wires into parallel sockets of a self-tightening chuck. This results in a short circuit when turned on.
- Assembly replacement due to poorly pressed central contact. Often this element is bent and not pressed against the base. But if you gently bend it, the malfunction can be fixed without installing a new part.
Connecting the light bulb socket to the wires is not difficult, since there are few connection options and they are all simple. The main thing is to comply with safety standards and exclude the closure of bipolar wires.