How to install xenon lamps yourself
The xenon lamp was developed back in the 40s of the last century. This light source with a uniform spectrum, close to natural light, was originally used for stage lighting. Since the beginning of the 90s, xenon lamps have been widely used in automotive lighting as lamps for dipped and main beam headlights. For turn signals and dimensions, Xe-based lamps are not used - they do not like frequent switching on and off.
What you need to install xenon lamps
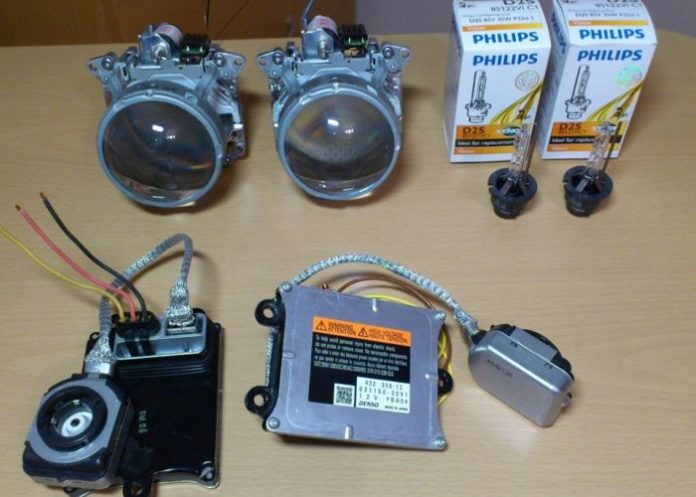
You can install and connect xenon yourself. This will require:
- actually xenon lamps;
- ignition blocks - one for each headlight;
- high-voltage wires from the ignition unit to the lamps;
- conventional wires from the on-board network and control circuits to the ignition units.
In many cases, all this can be bought as a set, but you can also buy separately. You will also need materials for attaching ignition units inside the car.Depending on the chosen method, these may be:
- plastic ties (clamps);
- double sided tape;
- metal screws.
You can not do without small carpentry tools (screwdrivers, wrenches) - selected in the course of work.
Xenon connection diagram
The connection diagram is simple, but different for two lamp options - xenon and bi-xenon. What they have in common is the presence of an ignition unit (it is often called the wrong term in this case - ballast). This is an essential node. To initiate the ignition of the arc, ionization of the interelectrode gap with a voltage of 25-30 kV is required for a short time. After that, the voltage can be reduced to several tens of volts - this is enough to maintain the physical processes that cause the glow. The formation of these voltages is assigned to the ignition unit. It is connected between a 12 volt lighting control circuit and an Xe lamp.
If a standard headlight uses separate lamps for low and high beams, then instead of each lighting element, a separate xenon lamp with its own ignition unit is installed.

If the standard headlight used one lamp with filaments for low beam and high beam, then it will be necessary to install a bi-xenon lamp. Its brightness and glow intensity when an external signal is applied are regulated:
- built-in shutter (bi-xenon lens, obsolete, almost out of production);
- changing the position of the flask.
You will need an additional signal that switches the low beam to high beam. Its formation depends on the initial electrical circuit of the car, so in many cases it will be necessary to connect the control wire in place.
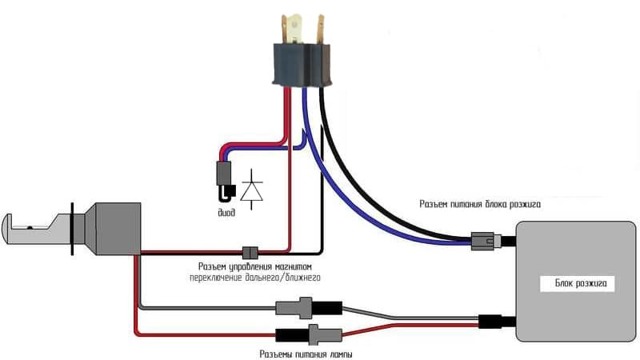
There are two basic schemes for switching on a double lamp. The first is using a diode. It decouples the ignition and control circuits.
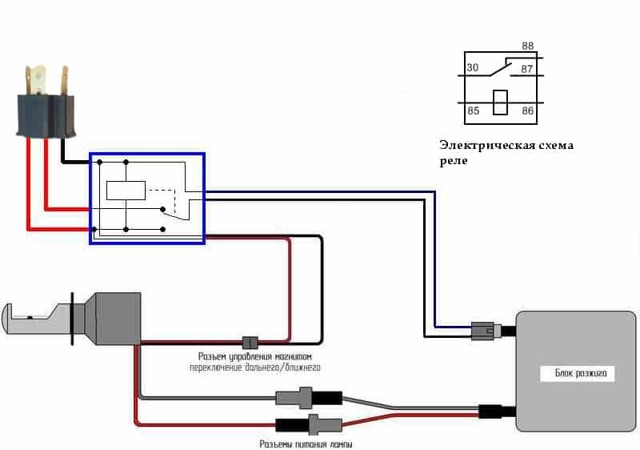
The circuit separation scheme using an electromagnetic relay looks somewhat more complicated. The connection of the connector to the high-low beam control circuit is selected based on the actual electrical circuit of the machine.
Rules for the selection of xenon lamps
First of all, you need to choose lamps according to a trusted manufacturer. The following companies have a good reputation in the Russian market:
- Osram;
- Sho Me;
- Philips;
- Silverstar;
- clearlight;
- other domestic and foreign manufacturers.
But even in the line of lamps of one manufacturer there are products with different technical characteristics. Before you install bi-xenon or xenon on your own, you need to make an informed choice on these parameters.
According to the compatibility of the base
Xenon lamps are available with three plinth series – H, D, HB. Data on the use and purpose of lamps within the series are summarized in a table.
| Series | plinth | Application |
|---|---|---|
| H | H1 | High beam, low beam, fog lamps (PTF) |
| H3 | PTF, rarely high beam | |
| H4 | Bi-xenon lamps for near and far lighting modes | |
| H7 | dipped beam | |
| H8 | PTF, rare | |
| H9 | High beam, rare, mostly in German cars | |
| H10 | Occurs extremely rarely | |
| H11 | PTF for Japanese-made cars | |
| H27 | PTF for Korean-made cars | |
| D | D1S | Near world. Built-in ignition unit. |
| D1R | Near world. It has an anti-parasitic coating. | |
| D2C | Near world. For installation in a lensed headlight. | |
| D2R | Near world. | |
| D4S | Near world.It is installed in the lensed headlight of Toyota and Lexus cars. | |
| HB | HB2 (9004) | Occurs extremely rarely |
| HB3(9005) | High beam, less often - PTF. | |
| HB4 (9006) | PTF | |
| HB5(9007) | Occurs extremely rarely |
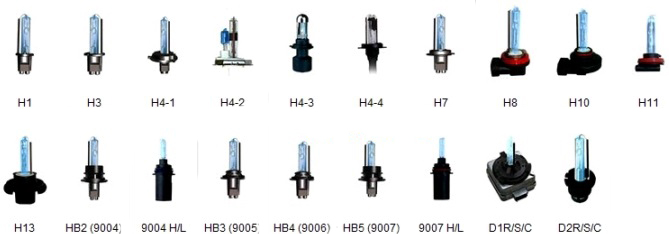
The H4 base is the most massive, it is the most common. Lamps with H1 base are the most versatile. The selection of a light-emitting element according to this design is simple - if you don’t want to mess around with alteration, you need to buy lamps with the base that stood before. Size H4, by the way, is very common in halogens, so installing gas discharge lamps instead of standard ones in most cases is not difficult.
According to the glow temperature and power consumption
We must immediately make a reservation that the term "color temperature" (CT) does not apply to the real temperature, which can be measured with a thermometer. In fact, the melting point of, for example, steel is about 1500 K, tungsten - 3500 K. It is difficult to imagine what material a lamp should be made of that can withstand heating up to 5000..7000 K. In fact, if you do not go deep into physical phenomena , color temperature only characterizes the emission spectrum of a white light source, or its hue.
The emission spectrum of pure xenon has a color temperature of about 6200 K, which means a blue shift. This setting is not very comfortable for the human eye. The retina of the organ of vision has the greatest sensitivity to light, whose spectrum corresponds to about 4600 K. Therefore, lamps with this color temperature are considered the best in terms of efficiency. The emission spectrum is shifted towards the yellow part by adding various impurities to xenon (including mercury vapor).Also, the color of the lamp bulb somewhat affects the CG.
Good results are also given by lamps with a large shift to the yellow region, to the color temperature region of about 3500 K. The shift of the emission spectrum to the blue region (CG 5500 K and above) gives a good decorative effect, but such a lamp works worse as a lighting device. The perception of the outlines of objects decreases and color perception deteriorates.

If we talk about power, then the choice of motorists is small. Lamps are available in 35 or 55 watts. The first option is enough for all occasions. It makes no practical sense to increase the power - the increased light emission tires the driver's eyes, creating too sharp shadows. And the likelihood of blinding oncoming drivers increases.
How to connect correctly
The correct connection of xenon emitters is associated not only with technical issues, but also with problems with the law. Before you go to the store for a set of lighting equipment, it will be correct to study the regulatory documentation.
In normal headlights
It is technically possible to put xenon light emitters in conventional headlights. This is especially easy to do if the standard headlight has lamps with an H4 base. Alteration in this case consists in drilling holes for additional wire in the back of the lamp and installing ignition blocks under the hood. They must be installed in such a way as to minimize the ingress of dust and moisture on them. High-voltage wires must not be taut.
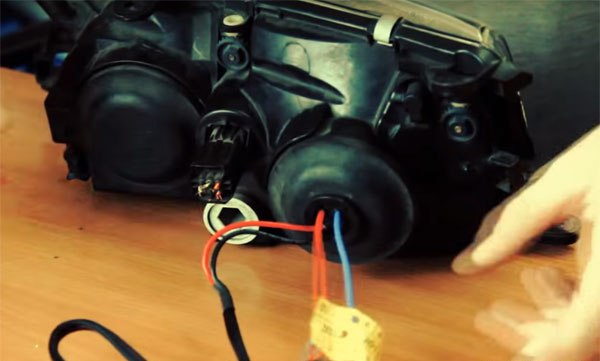
In whatever type of headlight a xenon or bi-xenon lamp would not be installed, the ignition unit must be positioned so that it is not necessary to cut high-voltage wires (for shortening or extending the insert). It will not be possible to restore the insulation of the cut wire at the desired level of quality using artisanal methods.
After connecting according to the chosen scheme, you can enjoy bright light without leaving the garage. To use converted headlights on public roads, you must at least:
- adjust the beam of light according to GOST;
- equip headlights with washers (otherwise, dirt particles will scatter bright light and redirect it in different directions, blinding oncoming drivers);
- if the car has regular hydraulic correctors, you need to make sure that they are in good condition;
- If there are no hydraulic correctors, this issue must be somehow resolved.
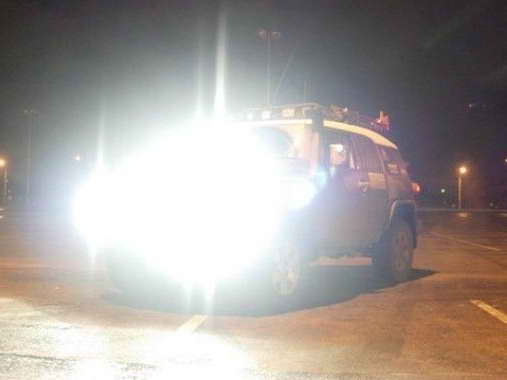
After that, you will have to visit the traffic police department to legalize the changes. It will be extremely difficult to legalize the installation of xenon in lighting devices that are not intended for this. You will have to travel from one traffic police post to another, collecting finesbut that's not the worst. Worse, all oncoming drivers will be blinded, and this can lead to an accident.
in the fog
Before installing gas-discharge light emitters in PTF, you need to familiarize yourself with the markings applied to the headlight. The letter H means that the fixture is designed for use with a halogen lamp only, and all problems are reduced to the previous section. If the lantern marked with the letter D, the installation xenon elements legal.
Technically, connecting xenon emitters in this case is no more difficult than connecting to conventional headlights. But PTF in most cases are located below the main lighting fixtures. It means that the choice of place for mounting the ignition units is limited. The length of the wires narrows down the mounting options for the units in protected areas.
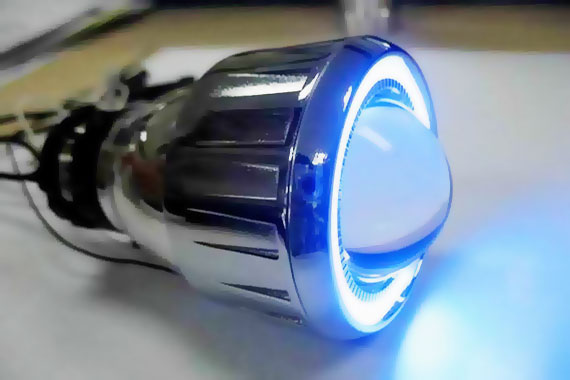
In lined headlights
From the point of view of the law, the most correct way to install xenon in the main lighting devices of a car. These headlights provide the most directional beam of light and reduce the risk of dazzling oncoming drivers.
There are two options for the development of events for installing xenon in lensed headlights:
- If the manufacturer has installed lensed optics and has a D mark on it, then there are no problems. It is necessary to purchase an installation kit and install it yourself or contact specialists.
- If the manufacturer does not provide installation of lens headlightsthen you need to contact the traffic police and obtain prior permission. You also need to pass an examination for the possibility of installing xenon and lens equipment. Then you can purchase a set of lighting equipment, with the obligatory receipt of a copy of the certificate from the seller. Next, you need to pass the examination again, install the optics and go for a technical inspection. All changes must be made to the documents for the car.
The procedure is lengthy, but it is quite possible to pass it. But all problems will be removed.
It will also be useful: How to check the xenon ignition unit.
For clarity, we recommend a series of thematic videos.
Obviously, the installation of xenon light emitters is associated with a number of problems, despite the many advantages.When deciding to equip a car with these modern lighting elements, you need to think not only about your convenience and how to protect your pocket from fines. The most important thing is to keep traffic safety issues in mind.