We adjust the headlights with our own hands
Almost any driver can adjust the headlights on their own. The main thing is to choose one of the proven configuration options and strictly follow all the recommendations for the work. It is also important to understand the features of the lighting equipment in order to understand which screw needs to be rotated and in which direction.
How should low beam headlights shine
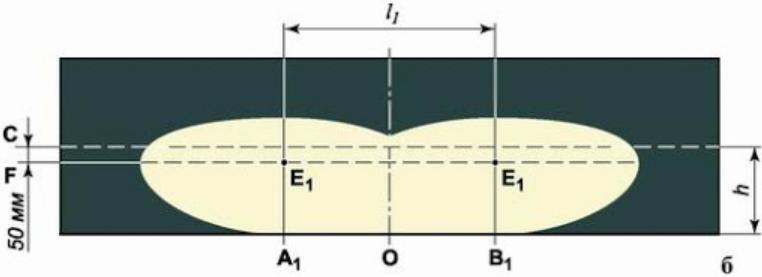
There are requirements for luminous intensity for lighting devices, but it makes no sense to study the indicators, since it is impossible to measure them without special equipment. Therefore, it is worth understanding the features of the low beam in order to understand how it should be under normal conditions. The features are shown in the diagram, it can be understood from it that the luminous flux is distributed unevenly, this is due to the different shapes of diffusers.
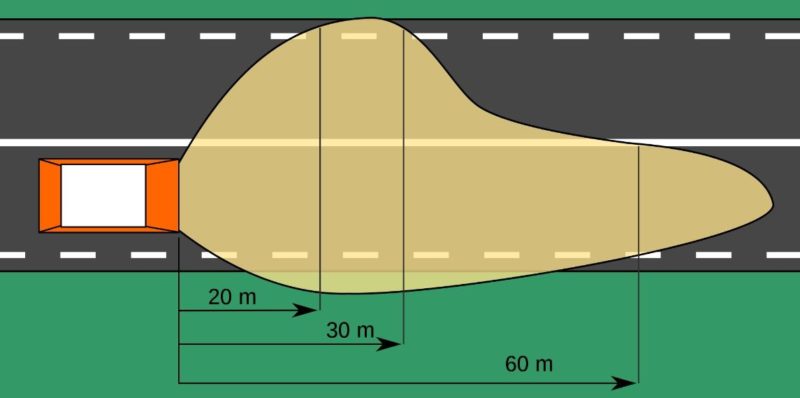
Based on the graphic image, several conclusions can be drawn:
- The main part of the light should be distributed along the traffic lane at a distance of at least 60 meters.
- The roadside should also be illuminated, for this the luminous flux is slightly shifted to the right (and in countries with left-hand traffic to the left).
- Part of the light is distributed to the oncoming lane. But here it is very important to adjust the light so that it does not blind oncoming drivers, for this, most often, adjustment is made.
In modern cars, automatic headlight range control is often installed, which lowers or raises the light, depending on how the car is loaded. In models with a manual corrector, this must be done independently.
Where are the headlight adjustment screws located?
Before starting work, you need to clearly know where the adjusting screws are. They are on all types of headlights, but the location may vary, as well as the design. It is important to remember the following here:
- The easiest way is to study the information in the car's operating instructions or find data on thematic forums dedicated to a particular car model. Often you can find a video where everything is shown clearly, which greatly simplifies the process.
- There are two screws on each headlight. The first regulates the luminous flux in the vertical plane, the second - in the horizontal. Therefore, you can adjust not only the height of the light, but also, if necessary, shift it relative to the roadway.
- The adjustment system may also differ. You can rotate the screws manually, using a flat or Phillips screwdriver, a hex or even an asterisk. It is worth clarifying this point in advance so that the right tool is at hand. Do not rotate plastic parts with an unsuitable tool, they are very easily damaged.
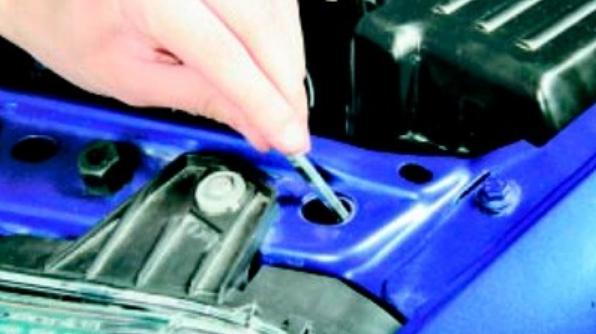
In some models, auto adjustment is carried out through special holes in the front lining.In this case, the main thing is to choose a screwdriver or other key of a suitable length.
Why is adjustment needed?
This work should not be done when problems occur, but at least once a year or as soon as a light disturbance has been noticed. Headlights need to be adjusted periodically for several reasons:
- Ensuring normal visibility at night. A large number of accidents occur due to the fact that the driver did not see an obstacle or a pedestrian in time.
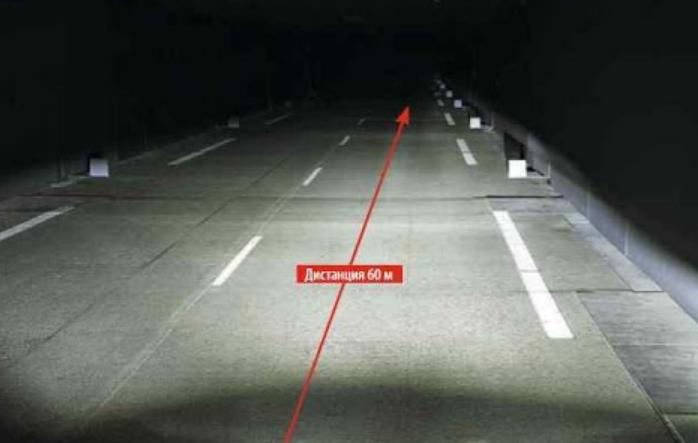
![We adjust the headlights with our own hands]() Dipped beam must provide visibility at a distance of at least 60 meters.
Dipped beam must provide visibility at a distance of at least 60 meters. - Avoiding blinding oncoming traffic. Because of this, accidents often occur.
- Maintaining the performance of the adjustment system. Plastic elements in a few years can simply stick to each other and will not move.
Without properly adjusted headlights, it will also not work to pass the inspection. It is better to make sure in advance that everything is in order with the light.
Setting
If it is not possible to set up the system in a car service, you can do it yourself. This will require a flat area with a wall or a solid fence opposite it. This is a prerequisite for any adjustment option.
dipped beam
In this case, it is easier to use the universal method, which is almost the same for all cars. Only the distance from the wall to the car can differ, most often it is 7.5 meters, but some models are placed at 5 meters, it is better to clarify this point separately in order to correctly adjust the light. Next, you need to prepare the markup.
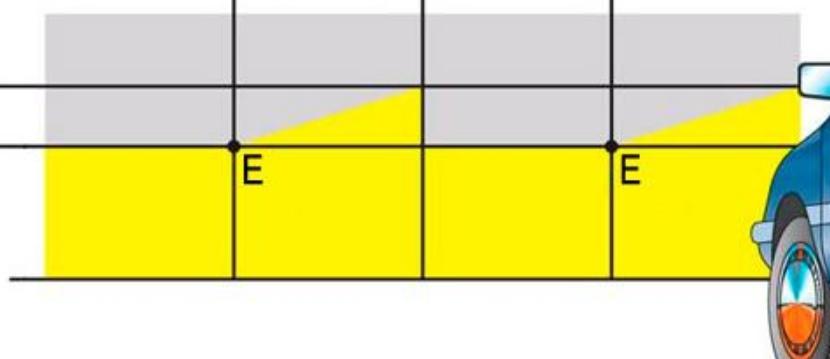
- The car is adjusted close to the wall or fence, after which marks are made on the surface clearly in the middle of the dipped beam headlights and opposite them. These will be the main guidelines.
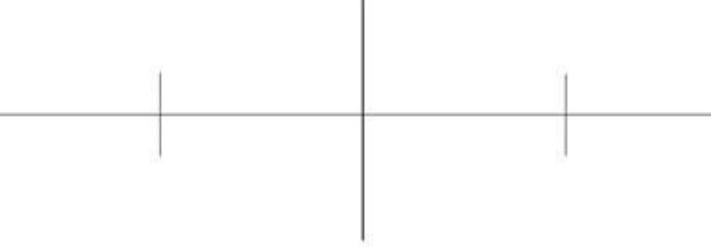
- Next, you can drive the car away and start drawing. Two more marks are placed 5 cm below the center of the headlights and connected by a horizontal line. Vertical lines are also drawn through the points so that there is a clear guideline.
- The central axis of the machine is determined and also marked on the wall. In the end, it should turn out approximately the same as in the diagram below.
Then you can start setting up. It is important that at least half a tank of gasoline is filled in the car, and a person is sitting in the driver's seat or a load is lying, approximately equal in weight to the driver. The easiest way to adjust the headlights near the wall is this:
- The machine is located at a distance of 5 or 7.5 meters, while the center line must coincide with the middle of the hood. It is important to set the car correctly.
- The hood opens and a screwdriver or other tool is prepared for adjustment. The light turns on and one headlight is covered with cardboard or any other opaque element.
- The upper edge of the luminous flux (it is clearly visible) should be located along the line. If it is displaced, an adjustment is made with the corresponding screw that regulates the light in the vertical plane.
- Adjustment in the horizontal plane must be done so that the place where the luminous flux begins to rise up falls on the vertical mark opposite the headlight.
The second method is in many ways similar to the first, but in this case you will need to position the car at a distance 10 meters from the wall.The horizontal line in this case is drawn 12 cm below the center. Some argue that increasing the distance provides more tuning accuracy, so if there is enough space, you can try this option.
Before adjusting the light, do not forget to set the zero position of the headlight corrector.
Video: A good example of setting the head light.
high beam
High beam headlights do not have clear lines, they distribute light evenly, so setting will be an order of magnitude easier. The preparation process is almost the same as with the dipped beam, the main reference will be a horizontal line 5 cm below the center of the headlights and vertical lines opposite the bulbs.
In this case, you need to adjust the light so that the center of the beam falls on the intersection of the vertical and horizontal lines of the corresponding headlight. Here accuracy is not so important, since high-beam illumination is used only when there is no oncoming traffic. If the low beam and high beam are combined in one bulb, then the adjustment of one option is enough for the headlight to work as it should.
If the adjusting screws do not provide normal adjustment, it is worth loosening the headlight mount and readjusting its position. Often problems with light are due to improper installation.
In the video, they put the high beam on the Hyundai Tucson.
Fog lights
In this case, there are no screws for adjustment and the position of the light flux can only be changed in a vertical plane. Before starting work, you should loosen the fastenings of the fog lamps. Often they oxidize, so it is advisable to pre-treat them with a penetrating lubricant.
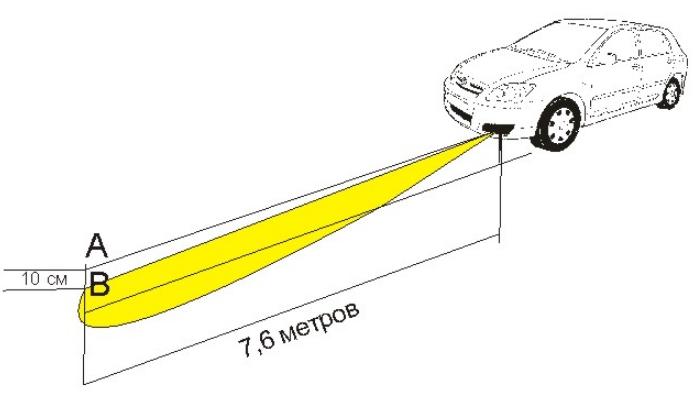
A line is drawn on the wall, its height should be 10 cm below the location of the foglights. After that, the car must be driven away by 7.6 meters, put in front of the markings and turn on the headlights. In this case, the upper limit of the luminous flux must coincide with the line, only such a position will ensure normal visibility into the fog.
Read also: How to improve car headlights
Security measures
In order not to harm your health and not break the headlights during work, you need to remember a few simple tips:
- Wear gloves when working and do not touch the wiring.
- Use only a suitable tool for the adjusting screws, they break very easily.
- Put the car on the handbrake.
- Do not apply excessive force when adjusting.
At the end, another method of adjustment.
Adjusting the headlights is easy if there is a flat area with a wall opposite it. The main thing is to correctly apply the markings, the accuracy of the adjustment depends on this. If, after work, oncoming drivers flash, then the light hits too high and needs to be lowered.