How to check xenon
When troubleshooting a car's lighting system, it's important to locate the problem. To do this, it is necessary to determine in general terms what is faulty - the control circuit, the xenon lamp itself or the ignition unit. To do this, you need to have some diagnostic skills and have a certain set of tools and devices.
What you need to check
For a complete inspection and repair offered as part of this review, the maximum set of instruments and fixtures looks like this:
- multimeter;
- serviceable ignition unit;
- working xenon lamp;
- oscilloscope;
- soldering iron with a set of consumables.
If there is no complete set, partial diagnostics and incomplete repairs can be performed without the missing list items.
Self-diagnosis options
It is quite possible to identify a faulty element of xenon lighting on your own. For this, it is not necessary to go to the service station. And some operations can be performed without additional equipment.
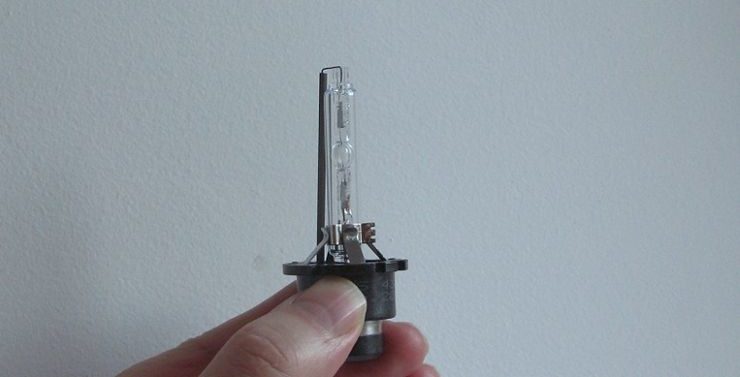
xenon lamps
A visual inspection of the lamps in most cases will not give anything - the faulty element looks the same as the serviceable one.
Lamps rarely fail at the same time. If two headlights do not light at once, there is reason to assume a malfunction in the car's lighting control circuit. If one light-emitting element does not light up, then you can check the xenon lamp by moving it from one headlight to another.
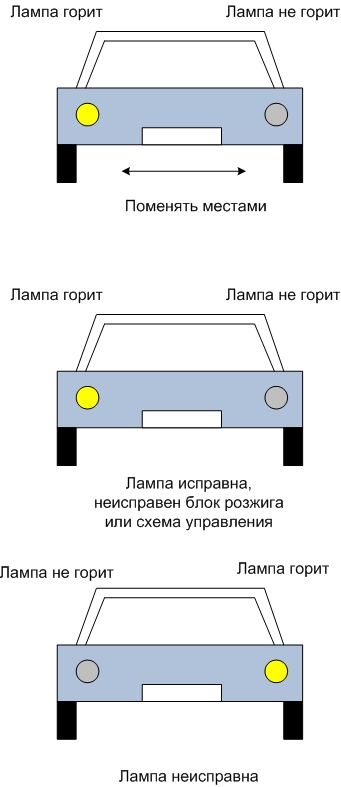
Possible options:
- nothing has changed, the lamp, which was not lit before, does not light up;
- in a new place, the lighting element started working, and the one that was burning before in the other headlight went out.
In the first case, with a high degree of probability, we can talk about the failure of the lamp. It will not be possible to check it with a tester, because most of the lamps fail due to depressurization (through microcracks).
Important! When rearranging the lighting elements, do not touch the lamp bulb with your hands!
In the second case, most likely a malfunction in the high voltage module, wiring or lighting control circuitry. To weed out the control circuit, you can check with a multimeter for the presence of a voltage of 12 volts at the input connector of the unit with the dipped or main beam turned on. If it is present, it is necessary to look for the cause in the electronic circuit of the module. If not, then the problem is in the management. To make sure finally, you can apply 12 volts directly from the car battery (highly preferably through a fuse).
xenon ignition blocks
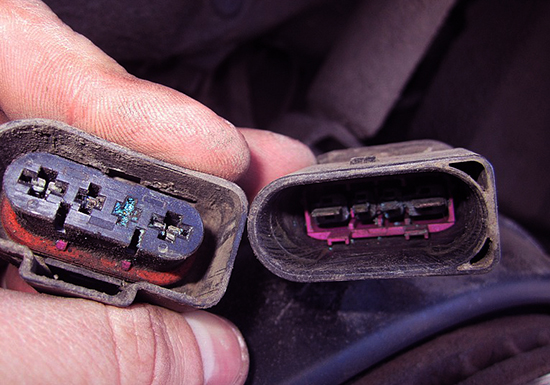
The first thing to start diagnosing ignition units is a visual inspection. First you need to inspect the housing of the electronic module. So you can detect corrosion, oxidation, broken connector pins.
If everything is in order, you need to open the casing of the electronic device and inspect the board for:
- traces of moisture;
- corrosion or oxidation;
- burnt or burned out electronic components;
- breaks in tracks or leads of radioelements;
- other suspicious-looking signs.
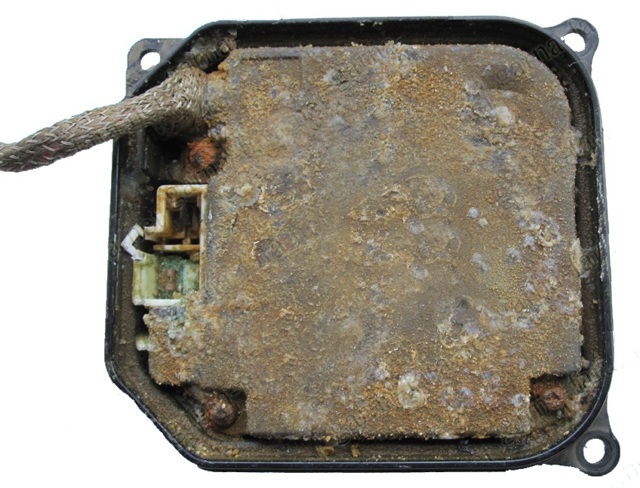
In the presence of such problems, there is every reason to assume that the cause of the malfunction is in the ignition unit. But if visually everything is in order, there is still no guarantee that the unit will work. Further verification needs to be done.
The surest way to check a high-voltage xenon ignition unit is to assemble a simple stand, consisting of:
- a voltage source of 12 volts of sufficient power (you can use a power adapter or a car battery);
- a known good xenon lamp.
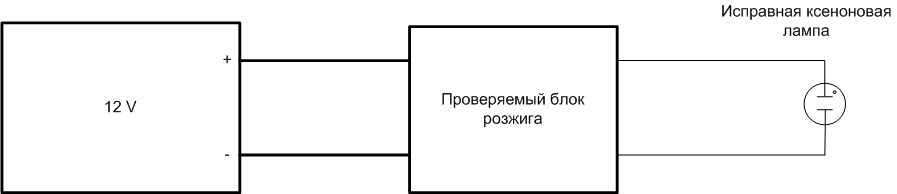
If you apply 12 volts to the ignition unit (remembering that there is a dangerous voltage at the output of the electronic module and taking all precautions !!!), then if it is in good condition, the lamp will light up, but if it breaks, it will not. If a known-good ignition unit is used in this stand, then it is possible to check the performance of xenon lighting elements.
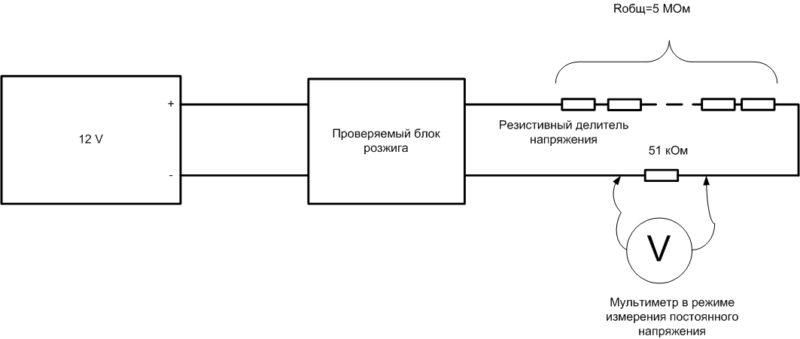
If there is no working lamp, you can try to measure the voltage at the output of the ignition unit. It is unlikely that in a home workshop there will be a device capable of measuring a voltage of 25,000 volts, but you can try to reduce the measured voltage using a resistive divider. To get a voltage of 250 volts acceptable for measurements, you need to take 1/100 of the original voltage.The resistance of the upper (extinguishing) part of the chain can be taken as 5 megaohms (taken from several of 0.5..1 Mohms), and the lower - 51 kOhm. The problem is that such a high voltage is applied for a very short time, and the device (both digital and pointer) may not have time to respond due to inertia.
Instead of a voltmeter, you can try to take a 250 volt incandescent lamp or an LED with an appropriate current-limiting resistor and try to detect the flash. There is room for experimentation here - but safety comes first!
Related article: Rating of car lamps H4 headlight
How to repair
Repairing a xenon lamp, available on its own, comes down to carefully removing dust and dirt from the base. If it does not help, the element must be disposed of and replaced.
If it is found that a noticeable amount of moisture has got inside the casing of the ignition unit, it is also better to replace the module. Operation in this state often leads to weakening of the insulation of the high-voltage part (transformers, connectors, etc.). Even if, after washing with a large amount of alcohol, thorough drying, soldering all connections and duplicating corroded board tracks, the high-voltage module can be revived, then its days are numbered. Current leakage through the weakened insulation will lead to a decrease in voltage, and this process will only develop. After a while, the block will die completely. Therefore, when installing xenon yourself, you must carefully choose a place for mounting electronic equipment.
If burnt components or elements with obvious traces of overheating are detected at the diagnostic stage, they must be replaced.
The reason for the failure of one element may be a malfunction of another, which is not visible externally.Therefore, the replacement of a clearly inoperative component does not guarantee the restoration of the module's serviceability.
You can take on further repairs if you have a certain qualification, a circuit for an existing high-voltage module (you can search on the Internet) and, at least, an oscilloscope.
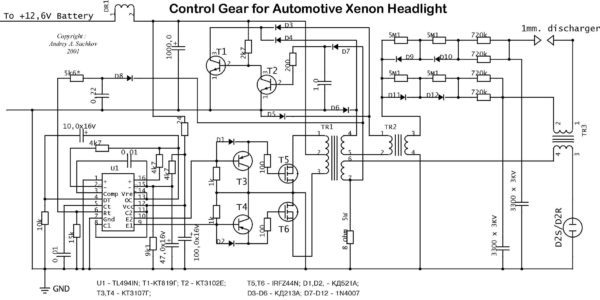
Most of the blocks are built on a similar principle - the pulse generator controls the keys that create a pulsed current in the primary winding of the transformer. An increased voltage is removed from the secondary winding and once again increased in the transformers of the second stage to form an ignition pulse. An example of troubleshooting and repair can be disassembled on a common circuit of a high-voltage module built on a TL494 chip.
First of all, you need to check the presence of a voltage of 12 volts at pin 12 of the microcircuit. If it is missing, you need to ring the power circuit from the input connector to the leg of the microcircuit. If everything is in order, you need to check the presence of pulses with an amplitude of about 12 volts at pins 9 and 10 of the microcircuit with an oscilloscope. If they are not there, you need to look for the cause (perhaps the chip has failed).

Next, you need to check the passage of pulses to the gates of transistors T5, T6, and then at terminals 1 and 3 of the pulse transformer TR1. If everything is in order, further diagnostics should not be carried out - you will have to take measurements in the high-voltage part. This can lead to failure of the multimeter or oscilloscope - their input circuits may not be designed to measure high voltages. If impulses are present and the block is faulty, as a gesture of desperation, you can:
- check all semiconductors (transistors, diodes) in a row;
- ring the integrity of the windings of all pulse transformers.
This must be done with the power off. If defective semiconductors or winding elements are found, they can be replaced. Transistors or diodes can be bought at the store. Foreign analogues (sometimes easier to find) of domestic semiconductor elements included in the circuit are listed in the table.
| Element | Analog |
|---|---|
| KT819G | BDX77, TIP41C |
| KT3102E | 2N5088, 2N5089, BC184B |
| KT3107 | BC446, BC557 |
| KD521 | 1N4148 |
| KD213 | VS-MUR1520 (functional equivalent) |
| 1N4007 | 1N2070, 1N3549 |
It is more difficult with transformers, but they can be taken from a obviously faulty donor unit. It is not worth rewinding high-voltage transformers - handicraft elements will obviously be worse than industrial ones, including the quality of the insulation. If all else fails, the block must be replaced.
For clarity, we recommend a series of thematic videos.
It is possible to independently diagnose the health of the elements of the xenon headlight system of a car. If qualified, partial repairs are also possible, but do not forget about the presence of high voltage in the system. Potentially unreliable elements are best replaced as soon as possible - safety should come first.