Connecting a 12V LED strip to a computer
If desired, the LED strip can be connected to a computer or laptop, as it is designed for a 12 V voltage used in system units. But to do everything right, you need to know the main features of the system, choose the right tape and attach it in one of the possible ways. Even those who are poorly versed in electrics will be able to figure it out, you need to follow a simple instruction.
Why do it
If you need to illuminate the space near the computer, you should not spend money and take up space with a lamp. You can get by with a piece of LED strip and the result will be no worse than the finished version. This solution is also good because it consumes a minimum of energy, this is the most economical backlight for today.
Lighting with using LED strip serves different purposes. Most often used like this:
- To illuminate the work area near the computer.In this case, you need to place the tape higher so that it captures the entire table.
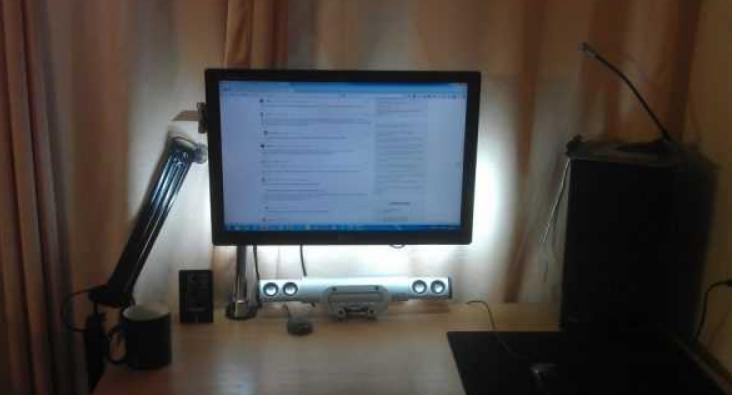
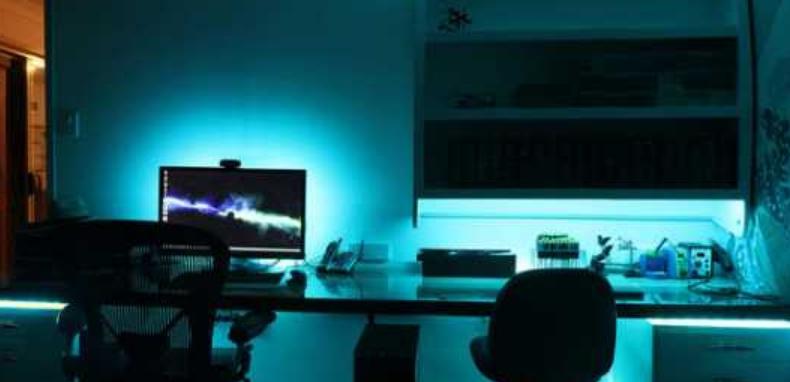
- Soft lighting around the computer. It looks especially impressive if the monitor is mounted on the wall, and the LEDs are located in the back. In this case, it is better to use a single color option.
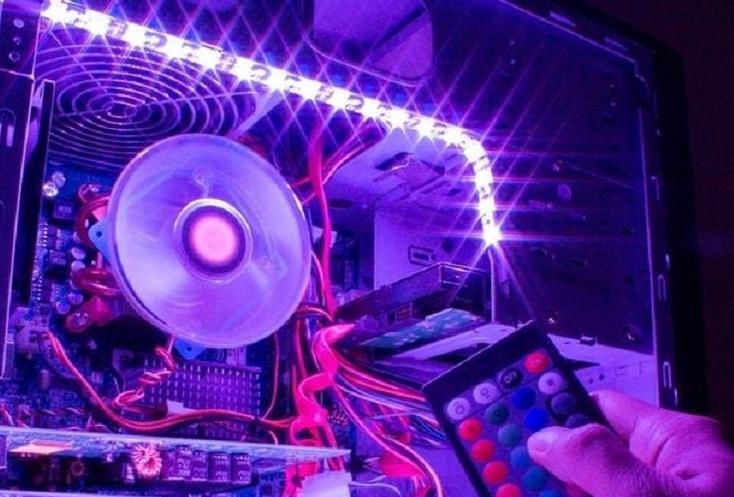
- Illumination of the system unit. If there is a top filling inside, and one of the walls is transparent, you can highlight the space around the perimeter. Or independently replace one partition with plexiglass and effectively design a computer.
- Illuminated keyboard for comfortable operation. There is not enough light from the monitor, so you can add a small piece of tape and highlight the space without creating too much light.
- Decorative lighting of the table or interior elements located near the computer. For example, can be glued LEDs on the edge of the tabletop or in its lower part. Or make a strip on the wall so as not to turn on the general light while playing games or watching a movie.
This method is good because to illuminate the space near the computer, you do not need to stretch the wires, of which there are already so many. And to connect, you don’t need an outlet, which also often causes problems, since you need to power a lot of devices. An additional plus can be considered a long service life, the backlight works normally for at least 10 years.
Training
First of all, you need to purchase everything you need for work. It is worth remembering that the LED strip can be ordered from China, but in this case there will be no guarantee as such. If you buy it in a store, you will have to overpay, but if problems arise, you can return the product under warranty. You need the following:
- LED Strip Light.Choose from a single or multi-color option, depending on the purpose. Only 12V products will work.
- Sharp knife. The easiest way is to use a stationery or construction tool with replaceable blades. You may also need scissors.
- Side cutters, instead of them you can take wire cutters.
- Wires for connecting elements.
- Soldering iron, as well as solder and flux. Small options with a small sting should be selected; it is impossible to solder the contacts with a standard device.
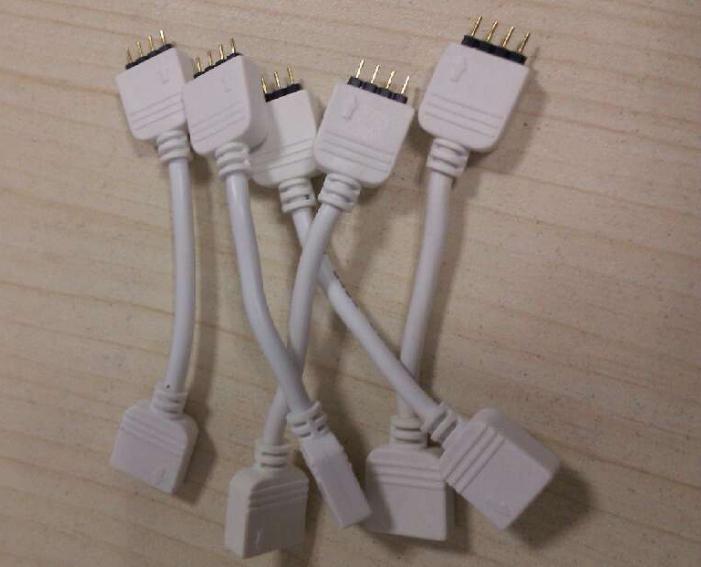
- Connectors, with their help it is not difficult to connect the wires without soldering. Choose according to the type of tape. For example, RGB has 4 pins, RGBW has 5, and RGBWW has 6.
For a multi-color version, you need to install a controller, with its help you can change the shades of the backlight. If connected directly, either only one color will light up, or all at once.
To adjust not only the color, but also the brightness, you must additionally purchase a dimmer.
Backlight Features
To make the system right, you need to understand its features and understand how to connect it correctly. The main points do not differ from the standard installation, but some require attention:
- Usually the length of the tape is short. This is due to the current limitations that are in the computer and laptop. It is easy to calculate the maximum length by the total power of the LEDs.
- The tape can be simply glued to any surface, or it can be hidden in a niche or on the inside of the countertop. It must be fixed to prevent damage.
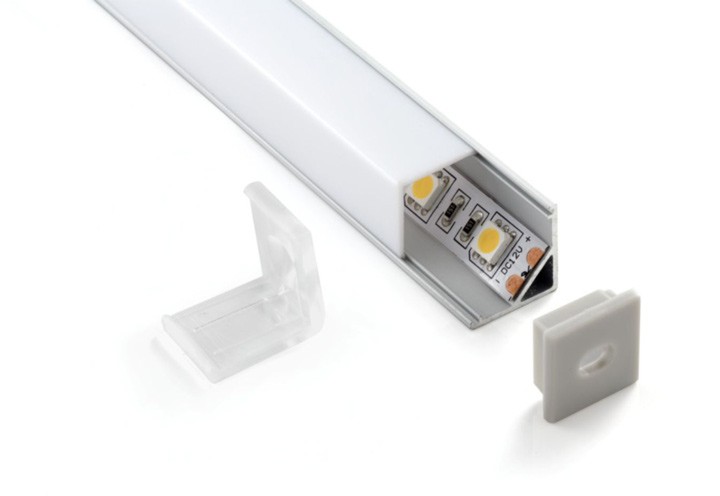
- If you want to get a uniform light, it is better to use a special diffuser.There is an aluminum profile on sale, which is covered with matte plastic on one side, it scatters light and makes it uniform along the entire length of the box.
- The system most often does not have an outlet, as it is powered by a computer. There may be different options - connecting directly to the motherboard, connecting via a universal connector with a suitable voltage, and connecting via USB. All methods are described below.
- Due to the low power consumption, the computer is not subjected to high loads. The main thing is to follow the recommendations and not exceed a certain level of current consumption, for this, accurately select the length of the connected tape.
- The backlight can work either constantly - turn on when you start the computer and turn off with it, or separately. For this, various switches and other devices are used.
This option is suitable for a PC, as it does not pose a danger to the system. The tape almost does not heat up during operation, therefore it does not increase the temperature when used inside the system unit. Mounting is easy, since there is always a self-adhesive layer on the back side, you only need to remove the protective coating. A small width and the ability to cut into pieces of any length allow you to adjust the backlight to any conditions.
Basic ways to connect to a PC
It is necessary to understand the features of each method in detail. Any errors can lead to problems with the LED strip or computer components. Compliance with simple recommendations will eliminate breakdowns and allow you to work efficiently, even if you have no experience in connecting.
From the computer power supply
This option is the most convenient and safe.The power supply is usually selected with a power reserve, so adding an LED strip to the power supply will not overload the node and will not reduce its service life. First you need to calculate what is the current margin in amperes. It is necessary to add up all consumers (motherboard, hard drive, processor, video card, etc.), data for each element can be found on the network. Usually there is a margin of at least 3-4 amps, which is enough to connect several meters of tape, it is convenient to use the table below to select a specific size.
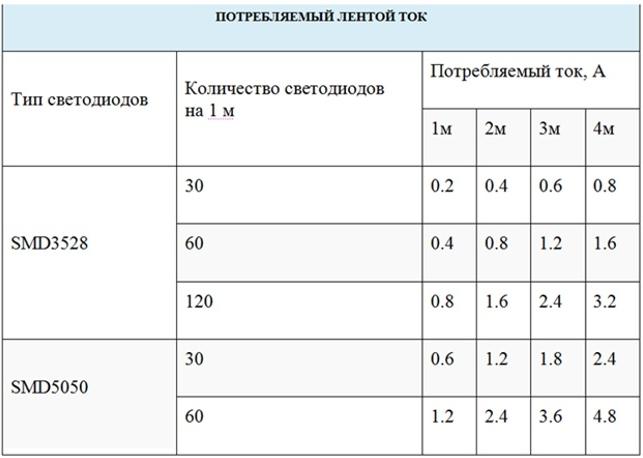
It is better not to select the length according to the maximum permissible load, it is worth leaving a small margin.
Carry out the work according to the instructions:
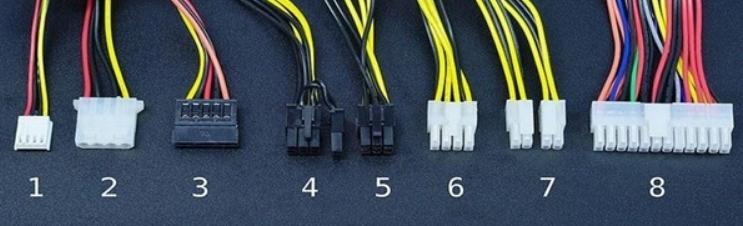
- You do not need to open the power supply and remove it. Inside the system unit there are always many spare connectors that are used for additional equipment, all of which are shown above. To power the LED strip, the first and second options are suitable, which are supplied with a voltage of 12 V.
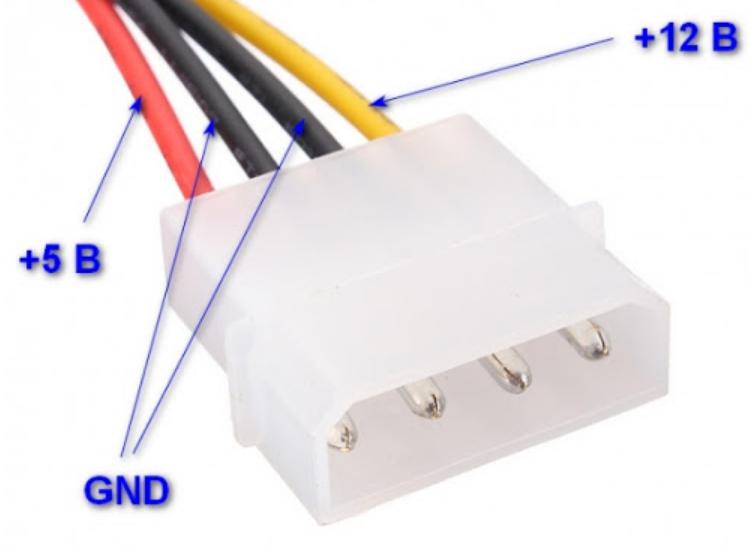
- The easiest way is to use a hard drive connector (the so-called MOLEX), since there are several of them in the block and it is much easier to buy a mating part for connection. 4 wires are connected to it - yellow, 2 black and red. It is necessary to disconnect or cut off the red core and one black one. The yellow one supplies 12 V, and the black one - minus, it is important not to confuse the polarity. The tape will not burn, but you will have to redo the work.
- Next, you need to apply voltage to the corresponding contacts of the LED strip from the yellow wire, and place the black one on the minus. Solder the connections carefully so as not to damage the base.The cut ends on the connector must be insulated to eliminate any problems.
- You can do it differently - take the wires from the connector and solder the corresponding leads directly to the LED strip. On the one hand, this option is simpler, but subsequently it will not work to disconnect the light, you will have to unsolder the connections. The connector also allows you to remove the LED strip at any time when it is required.
You can also use a floppy disk connector, if you have a counterpart at hand, work should be carried out in the same way as described above.
Through the motherboard
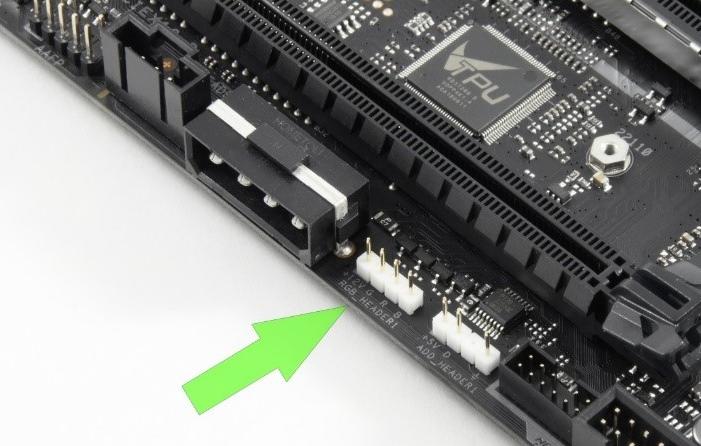
This option is the easiest, since you do not have to solder and redo something. But it is far from suitable for all motherboards, so first you need to check for the presence of a connector. It looks like four or five small pins labeled RGB (4 elements) or RGBW (5 elements) underneath. Usually the connector is on the edge of the motherboard, both options are shown in the photo. If it could not be found, then it will not work in this way. Connect the RGB strip to the motherboard according to the following instructions:
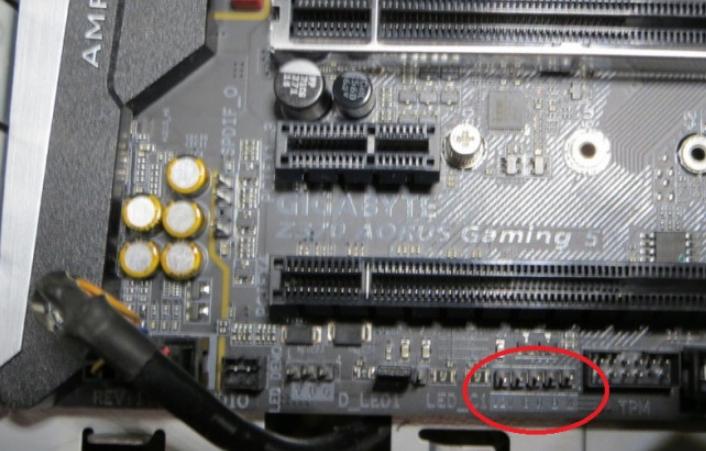
- Calculate the required length of Ice tape according to the same recommendations as described above for the power supply. Cut a piece along the line marked on the base so that there are contacts for connection.
- Use a connector to connect. You can buy it in stores that sell LED strip. One side is aligned with the cut end of the tape, after which it snaps neatly. Everything is simple, the main thing is not to move the element and fix it securely.
- Connect the chip to the connector on the motherboard.Do this carefully so that the pins enter the holes, do not press hard so as not to bend them. Click it all the way in, then check if the tape is working properly.
- Place in the selected place by gluing to the surface or using a special aluminum profile.
This is the best option, since the motherboard already has a dedicated space for the LED strip. The necessary voltage is supplied there and there is no need to worry that something will fail or overheat.
Thematic video:
Via USB
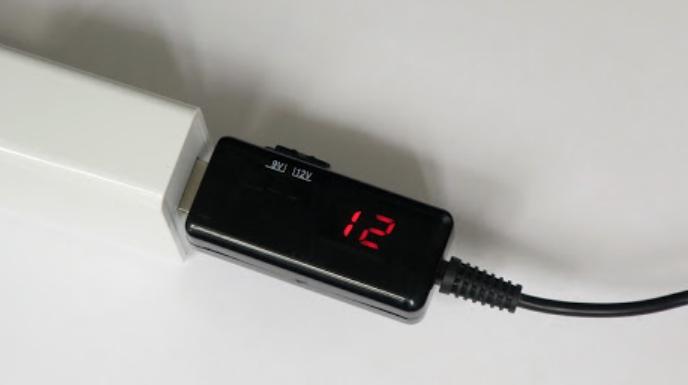
This method is used on laptops, since it will not work in another way to attach the line. You can also use it for a computer if the connector is brought out to the outside of the system unit. But there is one feature - USB is supplied with a voltage of 5 V and a current of 0.5 A. Therefore, you need to connect through a special converter, it is best to buy a ready-made version, as in the photo below. It is inexpensive, and at the same time allows you to attach the tape without unnecessary alterations.
The work should be carried out taking into account the recommendations:
- With a 2.5-fold increase in voltage, the current strength drops from 0.5 A to 0.2 A. Therefore, you can connect a small piece of tape, it is easy to calculate the exact length by summing the current strength on one diode. It's best to use tape SMD 3528 with the number of diodes 60 pcs. per meter, the length of the piece should not be more than 50 cm.
- The power wires from the converter must be connected to the LED strip. You can use a connector to connect wires. Insulate the joints with electrical tape or heat shrink tubing (the second option is much better and looks neater). The main thing is to observe the polarity and make the joints reliable.
- Check the operation of the tape by connecting it to the connector. If all is well, you can use the backlight.
If you do not calculate the correct length and use a large piece, then the USB will start to overheat and eventually burn out.
Backlight control
When connecting an LED strip to a computer, you need to consider how it will be turned on and regulated. If you miss this moment, then you will have to redo the work and add additional elements to the circuit. The main options are:
- Connect directly without any add-ons. In this case, the light will turn on when the computer starts up and go out after it is turned off. If using a connector or USB connection, you can turn it off while using the PC. The option is simple, but not very convenient.
- Adding any type of switch to the system. It can be a key under the table, a button or a switch, like on a sconce. There are no special restrictions, what will be convenient and suitable for a specific situation is selected.
- When using RGB, RGBW and RGBWW- tapes, it is necessary to add a controller to the circuit, without it only one or all colors will light up at once and it will not be possible to adjust them. The controller should be selected for a specific type of tape or buy a universal model, the main thing in it is to study the circuit in order to connect the equipment correctly. It is important to find a place for the controller, it should not be visible, but you do not need to hide it in a hard-to-reach place, the case needs to be cooled, it heats up during operation.
- If you need to adjust the brightness and color temperature, you should add a dimmer to the circuit. With this block, you can change the brightness, contrast and shades, as well as turn the backlight on or off.
- Some computer motherboard manufacturers (such as GIGABYTE) add special software that allows you to customize how the LEDs work. When connected directly, you can change the shades, brightness and adjust the backlight as accurately as possible through the program on the computer. There are also many effects that make the lighting original.

It is not difficult to connect a 12 V LED strip to a computer or laptop, if you take into account all the recommendations from the review and select the characteristics depending on the purposes and features of use. The main thing is to think everything over in advance, determine the exact length, buy the necessary materials and prepare the tool. Follow the connection diagram and securely isolate all connections.