Details about the connection and installation of DRL
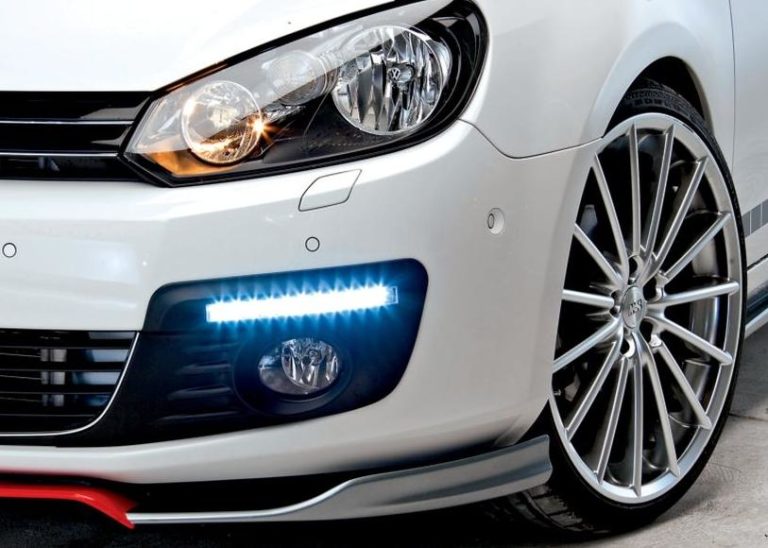
The rules of the road require that the car in the daytime move with the included daytime running lights (DRL, DRL). This increases the visibility of the car on the road and leads to a reduction in accidents. As a DRL, you can use the lights of the standard lighting equipment of the machine, or you can mount separate lighting devices for this. You can install running lights yourself, but you must follow certain rules.
Rules for setting traffic rules
The requirement for the presence of DRL is contained in the traffic rules, and the technical parameters of the lights are regulated by two GOSTs - R 41.48-2004 and R 41.87-99. According to their requirements there should be two lanterns, and the color of their glow is only white. Other characteristics must not go beyond:
- glow brightness 400..800 candela;
- the distance between the lamps - no more than 60 cm;
- distance from the edge of the car - within 40 cm;
- horizontal angle of opening of the light beam - 20 degrees, vertical - 10 degrees;
- installation height - 25..150 cm.
Paragraph 6.19 of GOST R 41.48-2004 says that DRL should light up when the ignition is turned on..
Important! Even if the DRL lights fully comply with the requirements of GOST, but their installation is not provided for by the regular design of the car, after installing the DRL, all changes must be registered with the traffic police without fail.
Selecting a connection scheme
There are various options for connecting DRLs. When choosing them, one must take into account one's own qualifications, the compliance of the work algorithm with the rules and state standards, and also the convenience of access to connection points.
The easiest option
The simplest DRL connection scheme is as follows.
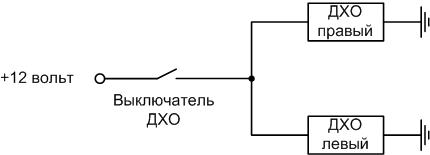
This option will require the installation of an additional switch that controls the DRL lights. When the ignition is turned on, you will need to manually turn on the lights, and when turned off, also manually turn them off. This is very inconvenient, you can forget to turn on the DRL, and even worse - forget to turn it off. This will drain the battery. In addition, installing an additional switch can damage the interior of the machine. Therefore, it is better to take 12 volts not from the battery, but through the ignition switch, from the output +.
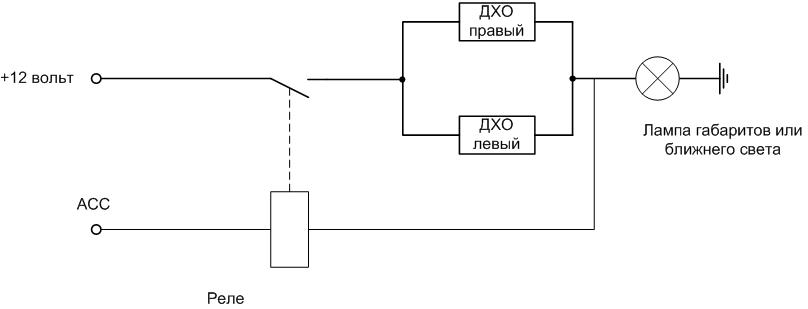
The best option is if the car's ignition switch has an ACC position for powering accessories. A wire of sufficient gauge is connected to this terminal, and a voltage of 12 volts is present when the ignition is turned on (except for the time the starter is running). In this case, the switch can be omitted.
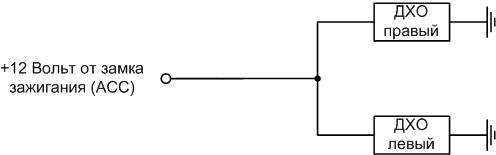
The disadvantage of this scheme is that DRL will be lit when other lights are on. It is possible to introduce an additional switch for manual repayment of DRL, but this scheme in terms of disadvantages is reduced to the previous one.
The DRL power circuits for any connection scheme must be protected by a fuse for the appropriate current (not shown in the diagram for simplicity).
Video master class for connecting DRL to Ford Focus.
How to make automatic inclusion of DRL
The best option is when the daytime running lights turn on automatically without any action from the driver. This can be done in many ways.
Through passing light or dimensions
To extinguish the DRL when the dimensions or low beam headlights are on, you can use the following scheme.
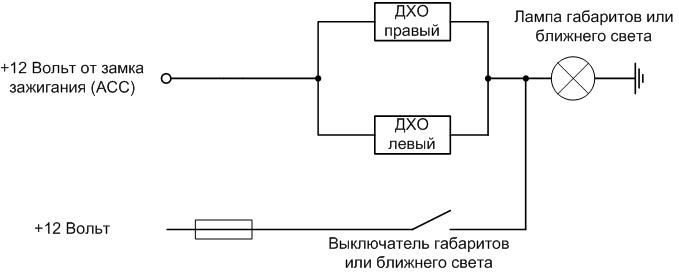
It works if:
- DRLs are built on low or medium power LEDs;
- in dimensions or low beam, an incandescent lamp is used.
The current flowing through the serial circuit “two DRL lamps - dimensions lamp” in this case is not enough to heat up the “Ilyich lamp” thread, but it may be enough to ignite the LED elements. It must be borne in mind that an incandescent light bulb limits the current in the circuit, so the brightness of the DRL may decrease.
When voltage is applied to the lamps of dimensions or dipped beam with a standard switch, a voltage of 12 volts will appear on the lamp, the potentials at both DRL outputs will equalize, and the running lights will go out.
From the generator
If there is no access to the ignition lock terminal, then a reed switch-based circuit can be used. This device is a sealed contact sealed in a glass tube. When an external magnetic field appears, the contact closes.In this version, the reed switch controls the magnetic field of the generator that appears during its operation.
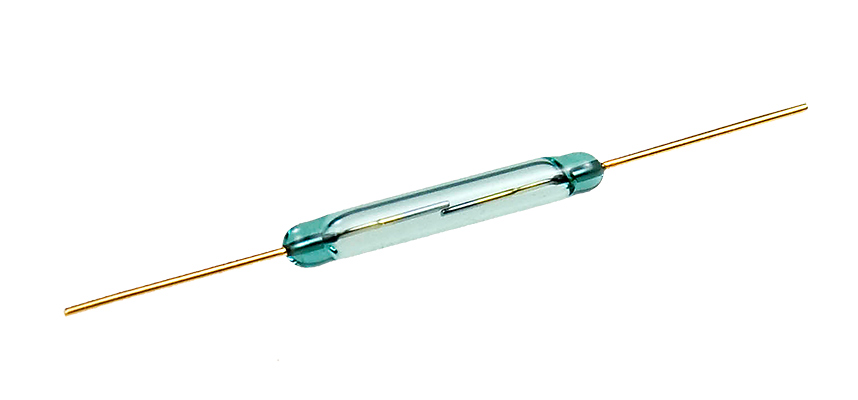
The contacts of the device are not designed for switching high currents, so it must be turned on through an intermediate relay.
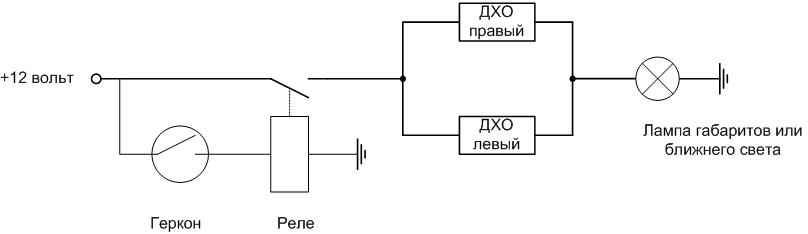
In order for the circuit to work, it is necessary to find such a position of the reed switch so that it closes stably when the engine is running and the generator is running and fix it at this point (for mechanical strength, you can tighten the magnetically sensitive device into heat shrink).
As soon as the generator starts to work, under the influence of its magnetic field, the contacts will close and energize the relay coil (you can use any car with four leads). The relay will close and energize the DRL lights. When you turn on the dimensions or low beam, voltage will appear on the lamp, and the DRLs will go out.
| reed switch type | Length, mm | Operating voltage, V | Switched current, mA |
|---|---|---|---|
| МКА-07101 | 7 | up to 24 | up to 100 |
| KEM-3 | 18 | up to 125 | up to 1000 DC |
| ICA-20101 | 20 | up to 180 DC | up to 500 |
| KEM-2 | 20 | up to 180 | up to 500 |
| KEM-1 | 50 | up to 300 | before 2000 |
From relay
DRL connection diagrams can be assembled on various automotive relays. They are easy to get at any parts store. Most relays are available in four-output (with a closing contact group) or five-output (with a changeover contact group) version.
In DRL connection diagrams, relays can also be used in other versions (non-automotive) with an appropriate group of contacts designed to operate from 12 volts. But automotive relays are convenient due to their availability, as well as their protected design. They are enclosed in a plastic case that prevents water and dirt from getting inside.
4 pin
In this scheme for connecting daytime running lights through an electromagnetic relay, a signal from the dimensions or low beam is also used.
In this circuit, the voltage on the relay coil is present when the ignition key is turned on, and is absent when the dimensions or dipped beam are turned on. The advantages of this option are the compliance of the work algorithm with GOST.
Video: Connecting DRL through 2 relays for automatic operation (not to forget to turn it on and off)
5 pin
The signal of a running engine can be the voltage from the oil pressure warning light. In most cars, it goes out when there is lubrication pressure - the contacts of the oil sensor disconnect the bulb from the common wire.

Initially, the oil pump does not work, the sensor contacts are closed, the light is on, the voltage at the lower output of the relay according to the diagram is zero, the relay is pulled up. Its contacts are open, no voltage is supplied to the DRL lights. When oil pressure appears, the sensor contacts open the electrical circuit, the lamp goes out. A relay connected in parallel with a light bulb is also de-energized. Contacts close, DRLs start to shine. When you turn on the dimensions or low beam, DRL go out.
The disadvantage of the scheme is the non-compliance with GOST. The lights here are lit only after the engine is started, and not when the ignition is turned on. Another problem is that the circuit is inoperative when used in the dimensions of LED emitters, and not incandescent lamps.
The wiring diagram for the lack of lubricating oil pressure lamp on different vehicles may vary. Before starting installation, it is necessary to analyze the operation of electrical equipment.
An illustrative video example of connecting through a 5-pin relay.
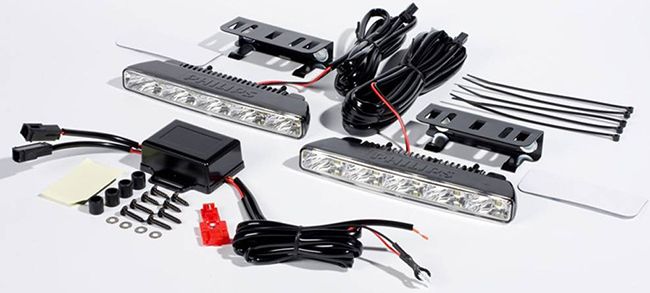
Via control unit
On sale there are control units for daytime running lights. In addition to automatic switching on and off, they are in most cases equipped with additional service functions. The connection diagram of industrial control units is indicated on their case or in the accompanying documentation.
Also in the global network you can find a lot of homemade products on common microcontrollers. Circuitry and software for such devices are developed by the authors. If desired, you can contact them to change the firmware for specific needs.
There are other DRL connection schemes (through a speed sensor, etc.). They can be found on the Internet, but before starting installation, such schemes must be analyzed for compliance with the work algorithm of GOSTs.
Read also: Making a DRL controller
The process of installing DRL on a car
Both home-made DRLs and industrial-made lights can be installed on the car. In the latter case, it makes sense to purchase a ready-made kit for mounting a lighting fixture.
What do you need
For self-installation of daytime running lights, you will need the following tools:
- Screwdriver Set;
- soldering iron with consumables;
- lighter or industrial hair dryer (for casing heat shrink tubing).
You will also need another small metalwork tool (pliers, wire cutters, etc.)
From the materials you will need:
- nylon clamps (screeds);
- heat shrink tubing (or electrical tape);
- self-tapping screws for fastening (there is an option to install on double-sided tape, but this is less reliable);
- several meters of two-core cable or wire.
As well as other electrical materials and components according to the selected scheme.
Where is the best place to mount
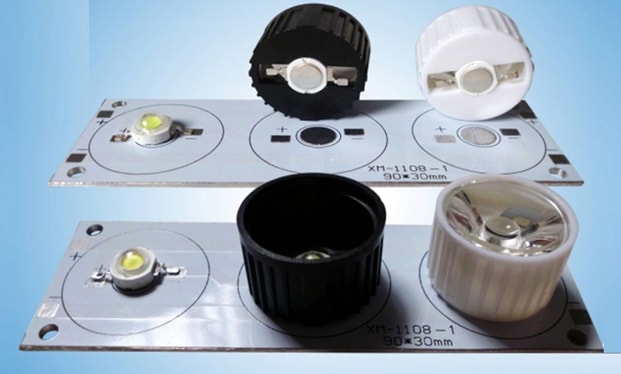
According to the rules, DRLs must be installed on the front panel of the car. It is most convenient to mount them:
- on the bumper (in place of regular fog lights or newly prepared seats);
- into the standard vehicle lighting system;
- embed into the radiator grille.
With any method, the dimensions and distances indicated above must be respected.
After choosing the installation site, the landing points must be prepared. This concept mainly includes cleaning the installation site from dirt, but if DRLs are installed on a radiator grille or on a bumper, holes must be cut to fit the DRL lights.
If metal clamps for installation are included with the lanterns, then the place must be prepared for them. After the mechanical fastening of the lights, you can lay the wires, fasten them with ties and mount the control circuit in any convenient place.
One of the installation methods is described in the video.
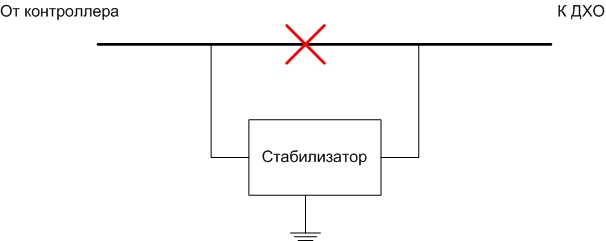
Connection nuances
There is a strong opinion that when connecting LED lights, it is necessary to use stabilizer, otherwise the service life of the LED lamps will be reduced. This is a controversial and debatable issue. But if you wish, you can install such devices. They are included in the break of the power wire DRL.
With basic knowledge of electrical engineering and minimal locksmith skills, you can install daytime running lights yourself. The main thing is to comply with the requirements of GOST. Otherwise, problems with registering changes in the traffic police cannot be avoided.